More eye methods Posted by VampireWombat on Jun 19, 2009
These are methods which I thought about in the past, but never have done.
Method A:
Step 1: Print out one of the eye patterns that I made specifically for this use.


Step 1B: If you don't have a color printer, paint the eyes with enough of a wash to color without covering the gradients.
Step 2: Carefully cut the eyes out.
Step 3: Choose your eye base. IE: Styrofoam balls, plastic Easter eggs, ping pong balls, plastic spoon, etc.
Step 4: Glue the pupil/iris onto the eye base. Use Mod Podge or another thinner glue that will absorb into the paper some.
Step 5: If you want it glossy, use clear spray paint, clear varnish, glossy Mod Podge, or some other glossy sealer over the paper. Make sure the edges are as flat as possible.
Step 6: Attach eyes to puppet.
Method B:
Step 1: Use a circle stencil to draw a thin black line onto white paper. If you happen to have a crochet hook/knitting needle gauge, use 16/P.
Step 2: Use a slightly smaller circle stencil to draw/paint the base color you want the eye to be. 15/N on the gauge.
Step 3. Use a smaller circle stencil to draw/paint with a darker shade of your eye color. 10/J on the gauge.
Step 4: Use a slightly smaller circle stencil to draw/paint your pupil. 9/I on the gauge.
Step 5: Use other shades of your eye color to add speckling on the iris.
Step 6: carefully cut out and glue onto your eye base.
Step 7: Make glossy if you want and used a paint that will allow you to use spray paint, clear varnish, or glossy Mod Podge. Test on another sample first if you're unsure.
Step 8: Attach eyes.
Method A:
Step 1: Print out one of the eye patterns that I made specifically for this use.
Step 1B: If you don't have a color printer, paint the eyes with enough of a wash to color without covering the gradients.
Step 2: Carefully cut the eyes out.
Step 3: Choose your eye base. IE: Styrofoam balls, plastic Easter eggs, ping pong balls, plastic spoon, etc.
Step 4: Glue the pupil/iris onto the eye base. Use Mod Podge or another thinner glue that will absorb into the paper some.
Step 5: If you want it glossy, use clear spray paint, clear varnish, glossy Mod Podge, or some other glossy sealer over the paper. Make sure the edges are as flat as possible.
Step 6: Attach eyes to puppet.
Method B:
Step 1: Use a circle stencil to draw a thin black line onto white paper. If you happen to have a crochet hook/knitting needle gauge, use 16/P.
Step 2: Use a slightly smaller circle stencil to draw/paint the base color you want the eye to be. 15/N on the gauge.
Step 3. Use a smaller circle stencil to draw/paint with a darker shade of your eye color. 10/J on the gauge.
Step 4: Use a slightly smaller circle stencil to draw/paint your pupil. 9/I on the gauge.
Step 5: Use other shades of your eye color to add speckling on the iris.
Step 6: carefully cut out and glue onto your eye base.
Step 7: Make glossy if you want and used a paint that will allow you to use spray paint, clear varnish, or glossy Mod Podge. Test on another sample first if you're unsure.
Step 8: Attach eyes.
Re: More eye methods Posted by StiqPuppet Productions on Jun 20, 2009
Thanks for providing a printable eyes to go with this tutorial....some nice ideas for your puppet eyes. 
Daryl H
Daryl H
Re: More eye methods Posted by miguel on Jun 20, 2009
Good method. Thanks for sharing
Re: More eye methods Posted by Na on Jun 20, 2009
Thanks for this. I recently tried my hand at doing something similar. I took a clear spoon, cut of f the handle, filed it down, and then painted the inside.
First I did a little white fleck, and waited for it to dry; then I painted a black pupil over the top. Dry. Painted an iris, using two different hues of blue, giving the iris 'streaking' by running the brush from the edge of the pupil to the outer edge of the iris. Then once that was dry I painted over the top with white. It turned out quite well, although I haven't used it for anything yet.
First I did a little white fleck, and waited for it to dry; then I painted a black pupil over the top. Dry. Painted an iris, using two different hues of blue, giving the iris 'streaking' by running the brush from the edge of the pupil to the outer edge of the iris. Then once that was dry I painted over the top with white. It turned out quite well, although I haven't used it for anything yet.
Re: More eye methods Posted by Shawn on Jun 21, 2009
Na,
Can we see a picture of your spoon eye?
Can we see a picture of your spoon eye?
Re: More eye methods Posted by Matt on Jun 22, 2009
Awesome Vampire, I'm bookmarking this.
Re: More eye methods Posted by Na on Jun 22, 2009
Posted by: Shawn Sorrell on Jun 21, 2009
Na,
Can we see a picture of your spoon eye?
Sorry the photos came out so badly - my camera has real trouble even with plenty of light. Just pretend the eye is a lot brighter. The back of the eye shows how I did it, just one layer of paint over another, with white being the last layer. I did cut out small stencils so I knew how big to paint each part of the eye, and also to try and keep 'within the lines', so to speak.


Re: More eye methods Posted by miguel on Jun 22, 2009
Thanks Na, for this instruction too. You guys are the best!
Re: More eye methods Posted by Na on Jun 22, 2009
Posted by: miguel on Jun 22, 2009
Thanks Na, for this instruction too. You guys are the best!
You're welcome!
Re: More eye methods Posted by VampireWombat on Jun 22, 2009
Thank you all for your comments and you're all welcome.
If anyone wants any other colors made or any specific animal eyes, let me know.
Na - Nice job with yours.
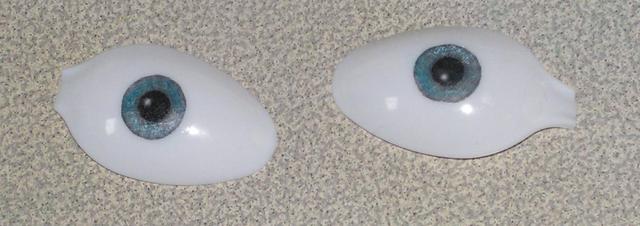
Here's a picture of some I did after posting this tutorial. Not quite as good as hoped. I don't have a decent printer and my water color pencils didn't work as well as hoped. But it should still give an idea of the effect you can achieve.
If anyone wants any other colors made or any specific animal eyes, let me know.
Na - Nice job with yours.
Here's a picture of some I did after posting this tutorial. Not quite as good as hoped. I don't have a decent printer and my water color pencils didn't work as well as hoped. But it should still give an idea of the effect you can achieve.
Loading
No More Post
Error
Loading