Gryphon Marionette Posted by Abdolos on Feb 08, 2010
OK, I'm sick of fixing old stuff. I want to try something new and complicated. I've decided that I'm going to try to build a gryphon, or griffin, or however you want to spell it. I've downloaded some pictures of the mythical creature, as well as of lions and eagles. I found some good stuff on the structure and working of bird wings, and I expect that I'll be consulting a great book I have that's all pictures of animal skeletons. My drawing board is a book, and the design work I did in it looks like this:
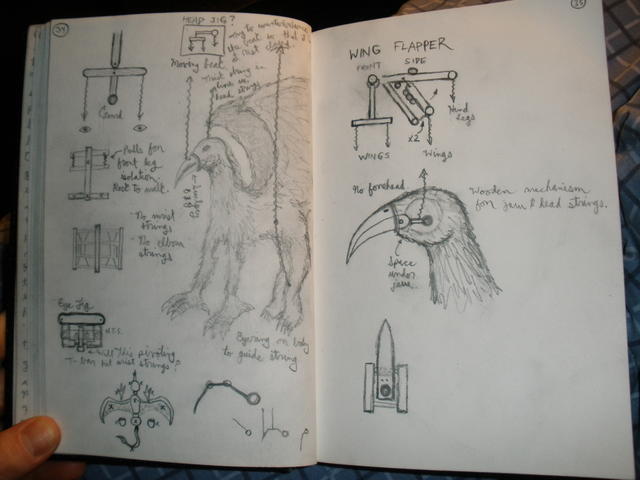
There are a couple of other ideas mixed in there, but you get the idea. You can see that I've decided to make the bird part of the creature less eagle-y and more like a nile bird of some kind; I'm making the beak move, so it has to be bigger to show off the trick.
I've been building in fits and starts for the last two days. Here is a picture of the separate pieces from a little earlier:
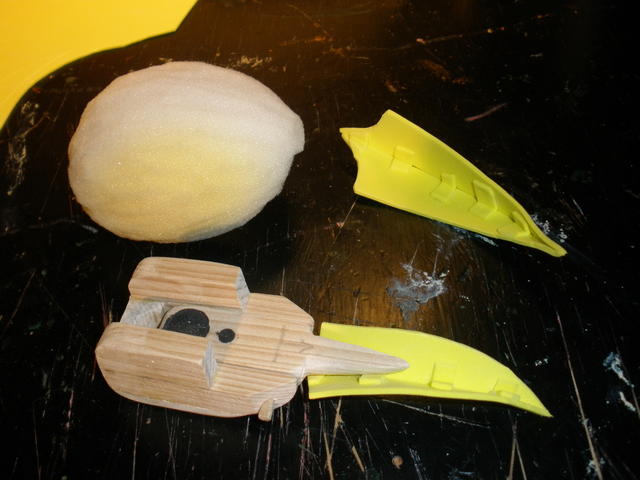
The head is that egg-shaped piece of carved foam-rubber. Ever wondered how something that was half-bird and half-mammal reproduced? Turns out they come from eggs! Here are the two pieces of the jaw on their own:
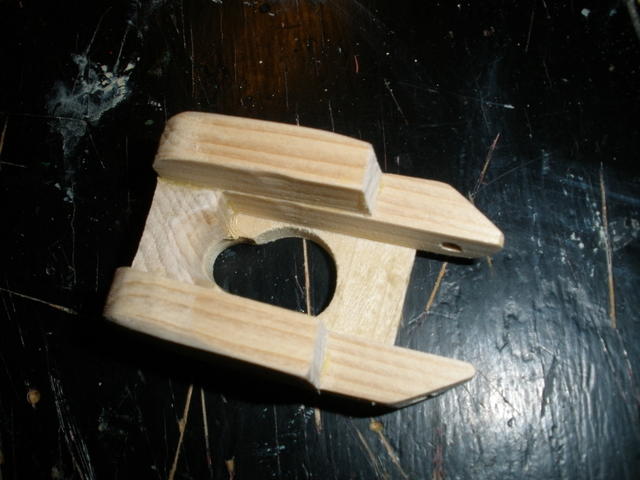
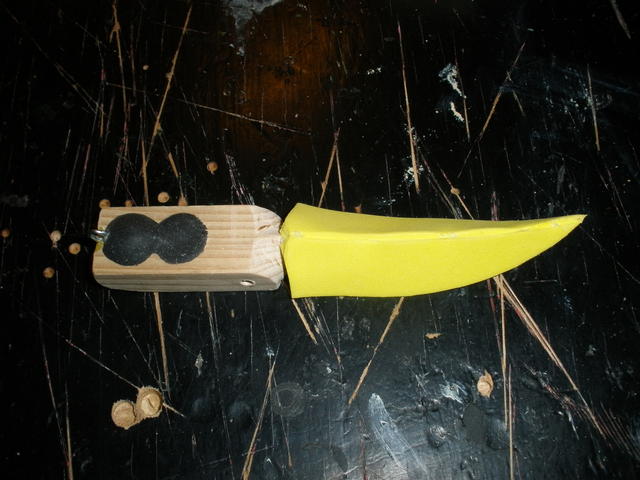
The black spots are sculpey. I drilled half-inch holes in that part of the wood and dropped in some ball bearings that I had lying around. Then I mashed in the sculpey to hold everything in place. The slightly larger lump has a couple of metal washers worked in as well. The jaw is counter-balanced so that the string will open it when pulled, which is, I think, more intuitively comfortable for the puppeteer then a string that closes the mouth. The eye-ring is where the mouth string will attach, and it is in a place where I can reach it to restring when necessary.
Here's later on in the night, when everything is coming together:
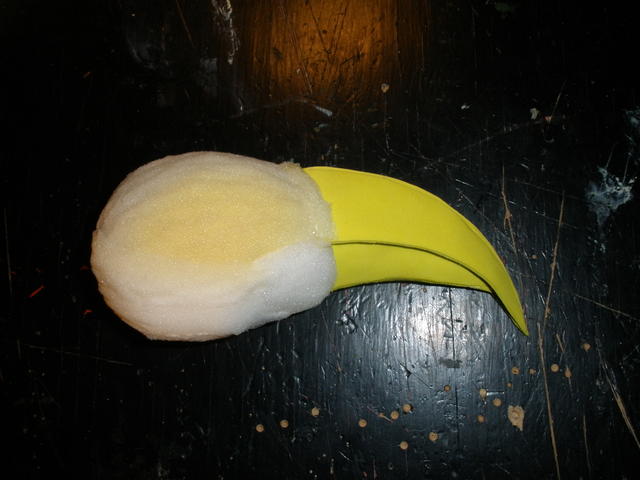
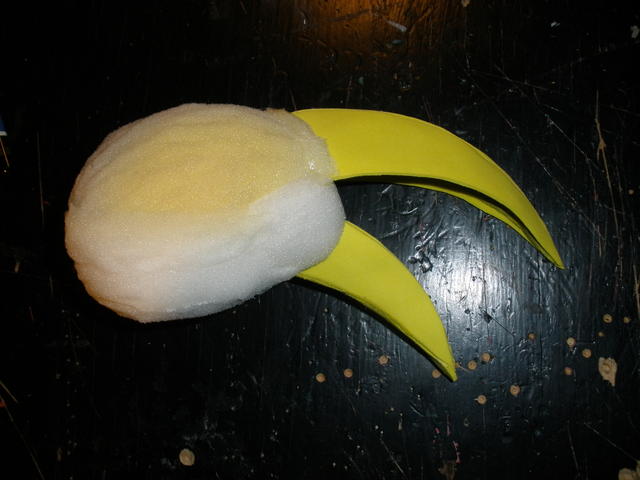
Everything is glued together here, and I've built up the foam rubber considerably. Unfortunately, I forgot to add the wood and eye-rings where the main head strings will go, so I have to cut the stupid thing open tomorrow! Luckily I've decided to cover the head with chopped up wool, so all of the many seams and imperfections will be hidden.
That's all for now, but I'll try to keep posting over the next few/many weeks as this thing comes together.
There are a couple of other ideas mixed in there, but you get the idea. You can see that I've decided to make the bird part of the creature less eagle-y and more like a nile bird of some kind; I'm making the beak move, so it has to be bigger to show off the trick.
I've been building in fits and starts for the last two days. Here is a picture of the separate pieces from a little earlier:
The head is that egg-shaped piece of carved foam-rubber. Ever wondered how something that was half-bird and half-mammal reproduced? Turns out they come from eggs! Here are the two pieces of the jaw on their own:
The black spots are sculpey. I drilled half-inch holes in that part of the wood and dropped in some ball bearings that I had lying around. Then I mashed in the sculpey to hold everything in place. The slightly larger lump has a couple of metal washers worked in as well. The jaw is counter-balanced so that the string will open it when pulled, which is, I think, more intuitively comfortable for the puppeteer then a string that closes the mouth. The eye-ring is where the mouth string will attach, and it is in a place where I can reach it to restring when necessary.
Here's later on in the night, when everything is coming together:
Everything is glued together here, and I've built up the foam rubber considerably. Unfortunately, I forgot to add the wood and eye-rings where the main head strings will go, so I have to cut the stupid thing open tomorrow! Luckily I've decided to cover the head with chopped up wool, so all of the many seams and imperfections will be hidden.
That's all for now, but I'll try to keep posting over the next few/many weeks as this thing comes together.

Re: Gryphon Marionette Posted by Shawn on Feb 08, 2010
This is going to be fun! Great start so far. Thanks so much for showing everyone the process. I know many are confused by moving mouths and yours shows this mech very well. I did want to say that for counter balance I use lead fishing wieghts. Lead is soft enough that you can pound it flat or into any shape you want. It also tends to take less material to get the weight you need since it is so heavy.
Re: Gryphon Marionette Posted by Rcdspoon on Feb 08, 2010
can't wait to see the whole process...so far it looks wicked!
Re: Gryphon Marionette Posted by Abdolos on Feb 11, 2010
Update time. I'm about to go on a big (non-puppet) working jag, so this is the last I'll post for a little while. I need the time to ponder, anyhow.
I've decided to skip the head connections for now, and go on to the other mechanical problems that this project is all about. Here are the neck and body blank that I made today:
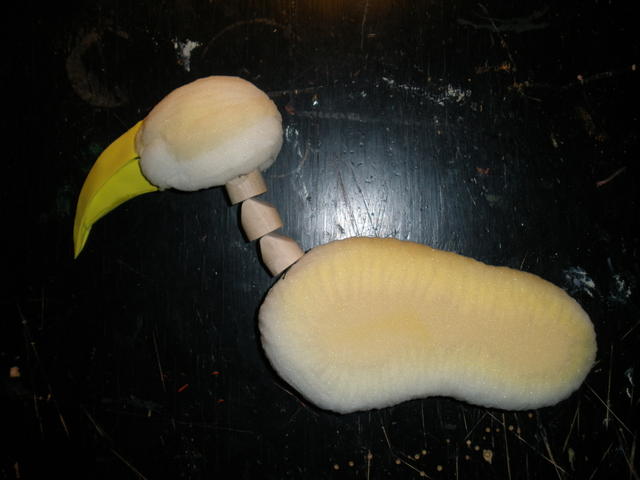
The neck is all made of dowel, and you can see how the shape that I've cut the individual pieces into restricts some movement and allows others. I've used this shape for the neck of a human marionette, and it works pretty well. Restricting movement is important in marionette construction; a totally free joint doesn't have to be anything more than a single string.
Now let's zoom in and see some detail. Super-macro, go!
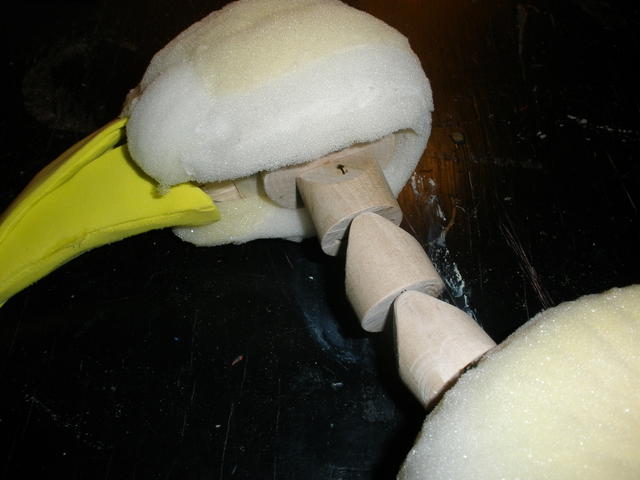
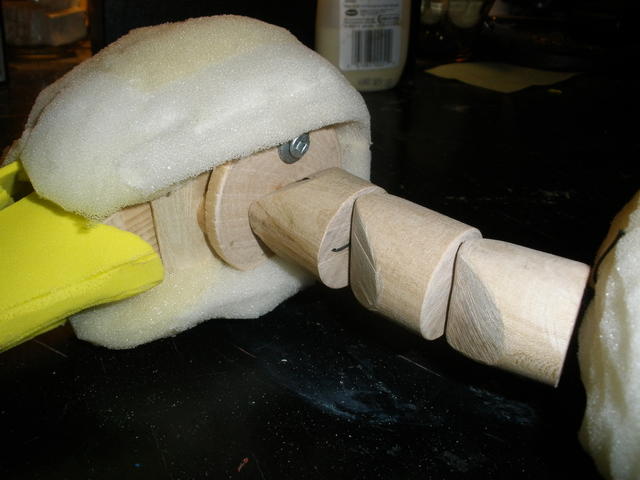
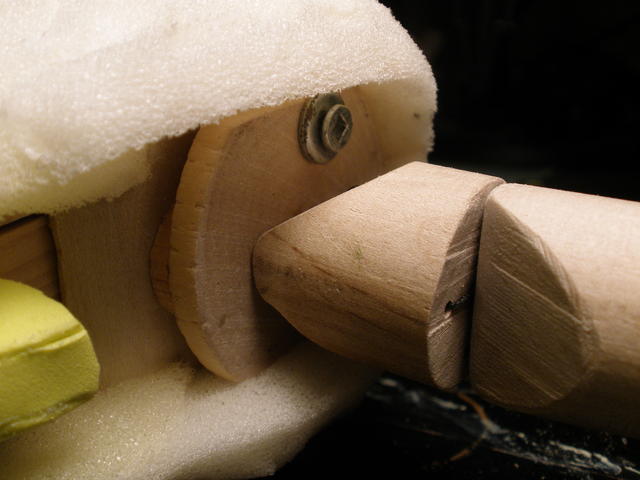
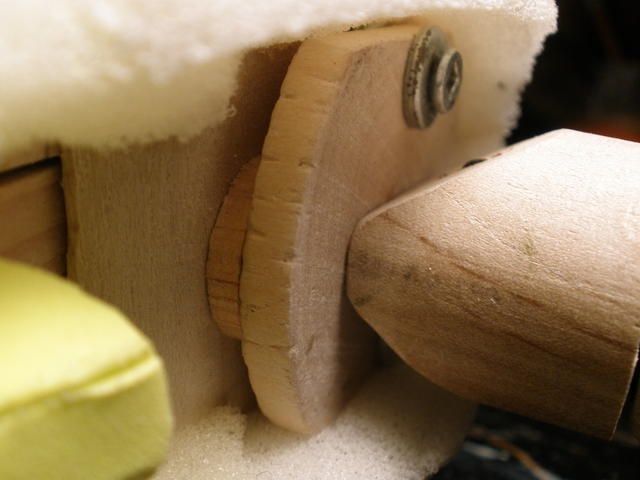
Here you can see the little wooden plate that I added to cap off the hole I made for stringing the working jaw. In the really close-up shot you can see that I've added some spacers between the plate and the bottom of the jaw. These are so that there is a little space under the plate that a string for the neck can run through without getting pinched. You might also notice that the neck piece closest to the head is rotated 90 degrees compared to the others. I hadn't planned to do this originally, but the screws I used to attach the plate got in the way of a neck piece with the same orientation as the others. I look forward to seeing how the change will work.
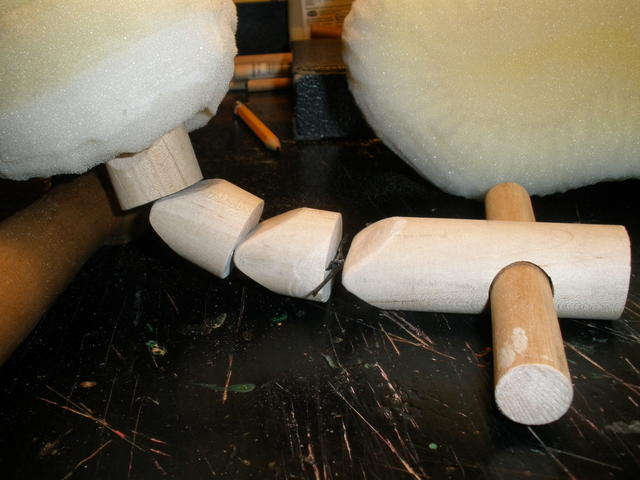
Here is the shoulder piece:
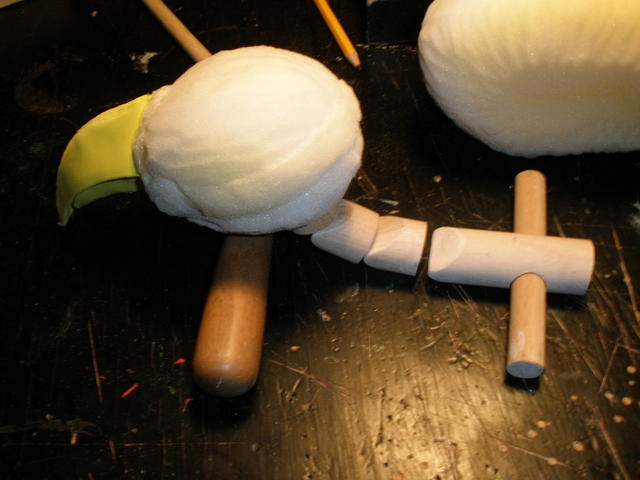
It still needs to be embedded in the foam, and I'm not entirely sure how the front legs are going to work, so it's good that I'm being forced to stop for a little while. Till then, a friend of mine found this drawing of a gryphon skeleton for me:
http://silvergriffin.deviantart.com/art/Griffin-skeleton-43438954
It should be very helpful!
I've decided to skip the head connections for now, and go on to the other mechanical problems that this project is all about. Here are the neck and body blank that I made today:
The neck is all made of dowel, and you can see how the shape that I've cut the individual pieces into restricts some movement and allows others. I've used this shape for the neck of a human marionette, and it works pretty well. Restricting movement is important in marionette construction; a totally free joint doesn't have to be anything more than a single string.
Now let's zoom in and see some detail. Super-macro, go!
Here you can see the little wooden plate that I added to cap off the hole I made for stringing the working jaw. In the really close-up shot you can see that I've added some spacers between the plate and the bottom of the jaw. These are so that there is a little space under the plate that a string for the neck can run through without getting pinched. You might also notice that the neck piece closest to the head is rotated 90 degrees compared to the others. I hadn't planned to do this originally, but the screws I used to attach the plate got in the way of a neck piece with the same orientation as the others. I look forward to seeing how the change will work.
Here is the shoulder piece:
It still needs to be embedded in the foam, and I'm not entirely sure how the front legs are going to work, so it's good that I'm being forced to stop for a little while. Till then, a friend of mine found this drawing of a gryphon skeleton for me:
http://silvergriffin.deviantart.com/art/Griffin-skeleton-43438954
It should be very helpful!

Re: Gryphon Marionette Posted by miguel on Feb 11, 2010
Nice job. I guess in few months I would pay more more attention to marionettes, and start doing that too. You guys are good!
Thanks for sharing!
Thanks for sharing!
Re: Gryphon Marionette Posted by Shawn on Feb 11, 2010
I think the change in placement of the first neck piece well be advantages. It seems like it would allow the head to tilt right and left, which would not be possible if you had not made the change.
Have a look at teddy bear or doll joints that you can buy at the hobby store. It may give you inspiration for the legs. I actually used them in some dinosaur marionettes that I made.


Have a look at teddy bear or doll joints that you can buy at the hobby store. It may give you inspiration for the legs. I actually used them in some dinosaur marionettes that I made.


Re: Gryphon Marionette Posted by Billy D. Fuller on Feb 11, 2010
Very Inter..est...ing !!!
Billy D.
Billy D.
Re: Gryphon Marionette Posted by johian on Feb 11, 2010
A great job so far!
These are lovely dino's you've made there Shawn! Are they totaly made of foam?
Johan
These are lovely dino's you've made there Shawn! Are they totaly made of foam?
Johan
Re: Gryphon Marionette Posted by Shawn on Feb 11, 2010
Johan,
The heads are PaperClay and the bodies are foam and fabric with some poly fill.
The heads are PaperClay and the bodies are foam and fabric with some poly fill.
Re: Gryphon Marionette Posted by Abdolos on Feb 15, 2010
To the fore!
I've managed to steal a few hours and work on the Gryphon. Here is the bottom piece of the neck with new holes drilled and strung on to the rest of the neck:
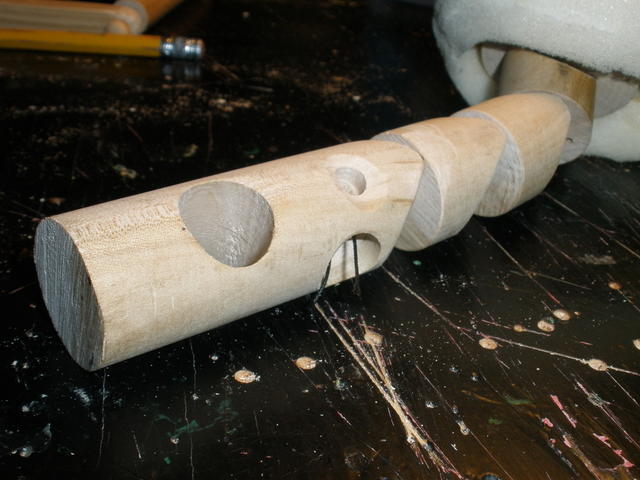
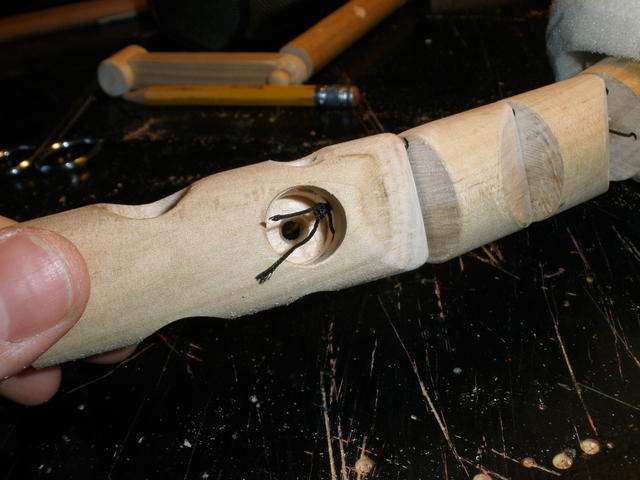
The holes on the sides of the larger upper hole are there so that I can tie snug knots in such a confined place. That little hole in the back is just the tooth that the drill bit I used uses to center itself.
And now the bird legs! Here's the skeleton with all the major mechanical parts:
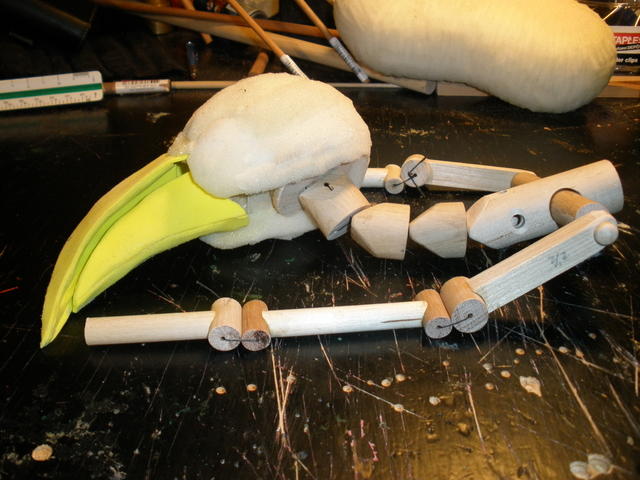
The gryphon skeleton drawing I'm working with has combined plantigrade and digitigrade bone structure in a really strange way, but I like it. I have yet to add the wire armature for the claws, but that's another piece entirely. All the pieces shown are for the leg structure. This is actually lying in a way that will be impossible when the stringing is done. I have yet to add the loops of string that will prevent the various parts of the legs bending in the wrong directions.
Now here's the whole thong embedded in the foam:
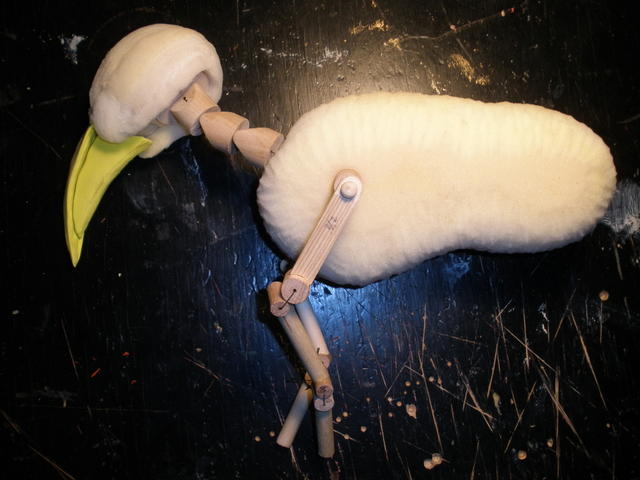
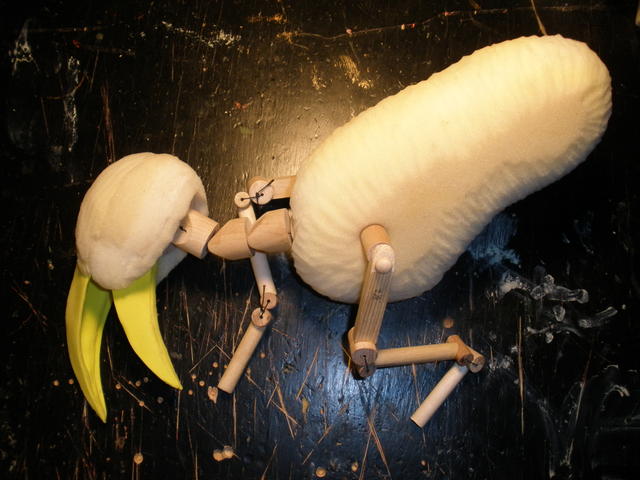
For the larger neck piece, I used my dremel with a sanding barrel to make the hole in the foam. I used the sanding barrel in the "wrong" way, pushing it in like a drill bit and only then using the sanding sides to widen the hole. It made a big mess, but worked very well!
Here's everything from the front:
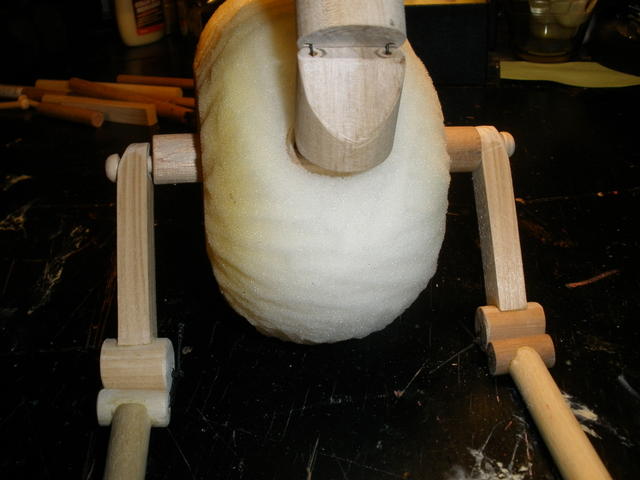
You can see that the shoulders are much wider than the body. I expect most of the leeway to be taken away when I build foam rubber onto the top sections of the legs. I'll probably use paper clay to build up on the narrower bottom sections.
Six more days of work coming up, but I expect I'll be able to grab a little more construction time somewhere in there. Talk to you then!
I've managed to steal a few hours and work on the Gryphon. Here is the bottom piece of the neck with new holes drilled and strung on to the rest of the neck:
The holes on the sides of the larger upper hole are there so that I can tie snug knots in such a confined place. That little hole in the back is just the tooth that the drill bit I used uses to center itself.
And now the bird legs! Here's the skeleton with all the major mechanical parts:
The gryphon skeleton drawing I'm working with has combined plantigrade and digitigrade bone structure in a really strange way, but I like it. I have yet to add the wire armature for the claws, but that's another piece entirely. All the pieces shown are for the leg structure. This is actually lying in a way that will be impossible when the stringing is done. I have yet to add the loops of string that will prevent the various parts of the legs bending in the wrong directions.
Have a look at teddy bear or doll joints that you can buy at the hobby store. It may give you inspiration for the legs.Thanks for the suggestion, Shawn. Though I didn't go look at the joints, you reminded me that I had doll joint pegs lying at the bottom of a box, and I'd never used them. You can see that that's how the shoulder part of the legs work.
Now here's the whole thong embedded in the foam:
For the larger neck piece, I used my dremel with a sanding barrel to make the hole in the foam. I used the sanding barrel in the "wrong" way, pushing it in like a drill bit and only then using the sanding sides to widen the hole. It made a big mess, but worked very well!
Here's everything from the front:
You can see that the shoulders are much wider than the body. I expect most of the leeway to be taken away when I build foam rubber onto the top sections of the legs. I'll probably use paper clay to build up on the narrower bottom sections.
Six more days of work coming up, but I expect I'll be able to grab a little more construction time somewhere in there. Talk to you then!
Loading
No More Post
Error
Loading