Re: Gryphon Marionette Posted by Chris Arveson on Feb 15, 2010
Absolutely amazing. I'm not engineer enough to be able to dream up such wonderful creations.
Re: Gryphon Marionette Posted by Abdolos on Feb 16, 2010
A little thing that I learned today and would like to share: How to drill a dowel from the centre of one end to the centre of the opposite end. Making the little joints today required ¾" long pieces of dowel drilled from one end to the other. The more accurate the hole that I drilled, the closer it was to the centre of the end on both sides, the better the joints would work. My holes were not all that straight. Why? This is so simple that I am ashamed to have worked so many years and not done it the right way. I used to just eyeball the entry point for the drill (which was, it's true, no problem) and then eyeball the exit point and drill along the imaginary line. I would roll the piece of dowel between my fingers to try to correct any wayward path of the drill. Well, unsurprisingly, it turns out that the imaginary line I was following is not that accurate, and having a real point marked on the end of the dowel that I was drilling to considerably increased my drilling accuracy. Like I said, I'm ashamed. I always marked my cuts, why not all my drilling points? Well, live and learn.
Re: Gryphon Marionette Posted by Abdolos on Mar 06, 2010
How often does a pause in construction mean a change in design? For me, a lot. I had some work to do as a stage hand for the Disney On Ice princess show as a dresser, and it turned out that there wasn't actually much to do during the time I was supposed to be there. As a remedy for boredom, I brought the play that I am working on to work and did a full read-through and annotation. Once the run of the show was over, I needed some time to update my computerized copy, so I spent three days energetically working on the play. After that I had some work to do on my giant head puppet, more editing of an earlier play of mine, and I composed some background music for a video of one of my puppets. Some more back-breaking labour to make money, and here I am. The point is that I haven't worked much on the gryphon lately, but the pause has made me reconsider how some of it is going to work. Here are the pieces that I thought were going to be included in the final work:
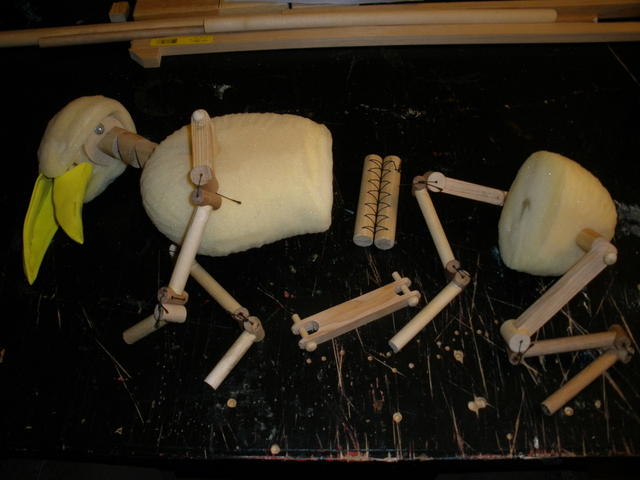
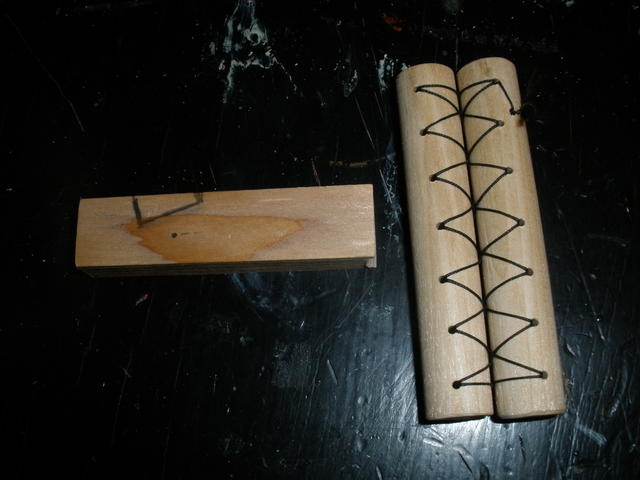
Most of it is staying, but one thing I've reconsidered is the working of the abdominal joint. It was going to have a side-to-side motion only, and here is what I made to accomplish that:
But the other evening I visited a friend who wants to make an interesting kind of horse-automaton. He had done some research on the motion already, and showed me some still shots of a horse running. He commented on the position of the hips and shoulders and what they had to do with propelling the horse forward. Though I cautioned him that a truly accurate motion is hard to reproduce, I now find myself wanting more motion in my gryphon's abdomen, and so in the relative positions of the hips and shoulders. I guess I can't take my own advice. Anyhow, I'm now going to try to sew some fake fur into the lion hind legs and glue the same fur onto separate pieces of foam to form the abdomen. I'm hoping this will give the creature some of the sinuous grace of a feline, but we'll see.
In the meantime, I've made the first piece of the wing structure:
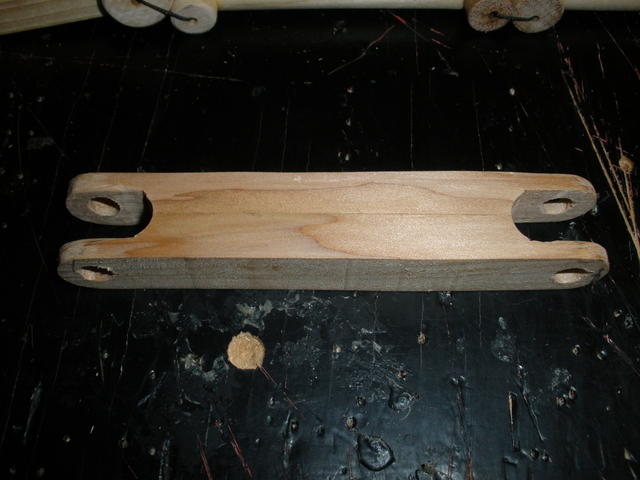
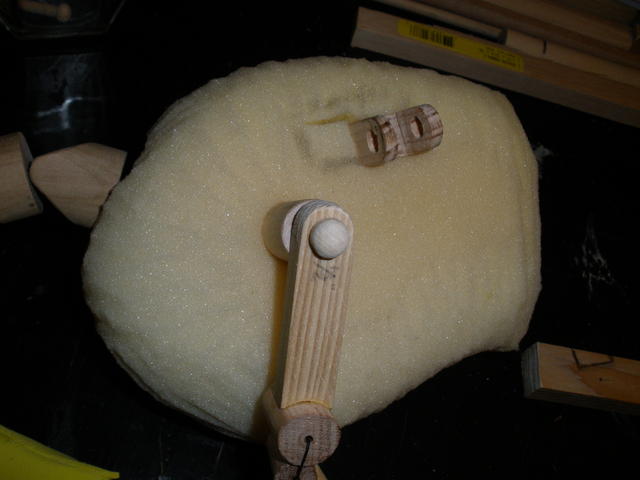
By building this thing out of two pieces that I then glued together, I found that I could use my saw and not have to deal with difficult inside corners. The wings will attach to the forks with more doll-joint pins. Here you can also see how I misplaced the hole the first time, and had to reinsert the foam that I'd cut away. Whoops!
Most of it is staying, but one thing I've reconsidered is the working of the abdominal joint. It was going to have a side-to-side motion only, and here is what I made to accomplish that:
But the other evening I visited a friend who wants to make an interesting kind of horse-automaton. He had done some research on the motion already, and showed me some still shots of a horse running. He commented on the position of the hips and shoulders and what they had to do with propelling the horse forward. Though I cautioned him that a truly accurate motion is hard to reproduce, I now find myself wanting more motion in my gryphon's abdomen, and so in the relative positions of the hips and shoulders. I guess I can't take my own advice. Anyhow, I'm now going to try to sew some fake fur into the lion hind legs and glue the same fur onto separate pieces of foam to form the abdomen. I'm hoping this will give the creature some of the sinuous grace of a feline, but we'll see.
In the meantime, I've made the first piece of the wing structure:
By building this thing out of two pieces that I then glued together, I found that I could use my saw and not have to deal with difficult inside corners. The wings will attach to the forks with more doll-joint pins. Here you can also see how I misplaced the hole the first time, and had to reinsert the foam that I'd cut away. Whoops!
Re: Gryphon Marionette Posted by Shawn on Mar 06, 2010
Great work as always. Here is an idea for attachment of the front and back sections of your body. One you could just use a spine of sorts made from a piece of rope. The other is to try and find a slinky that is the right size to connect the two. What is nice about this is that you can cover that with fur an it holds the shape of the body for you yet allows for that serpentine movement.
Re: Gryphon Marionette Posted by Abdolos on Mar 13, 2010
With more free time comes more puppet construction! To begin with, thanks, Shawn, for your suggestions, but I'm afraid that they are not complicated enough! I bet that a rope would have done just about the same thing as this spine that I built:
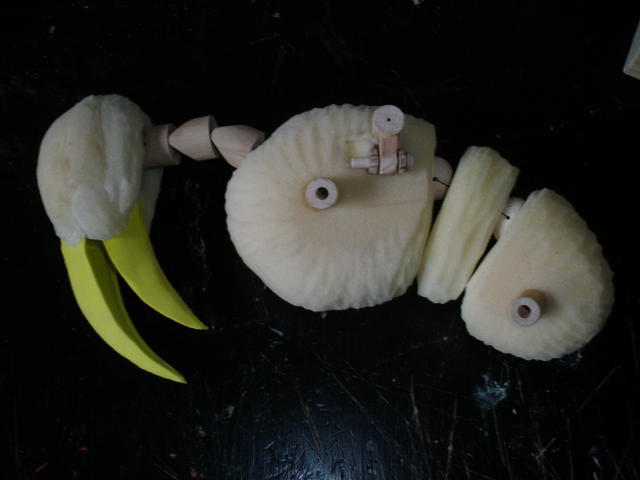
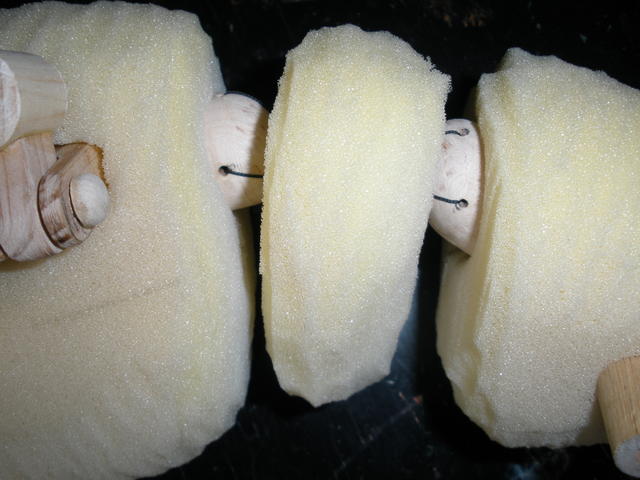
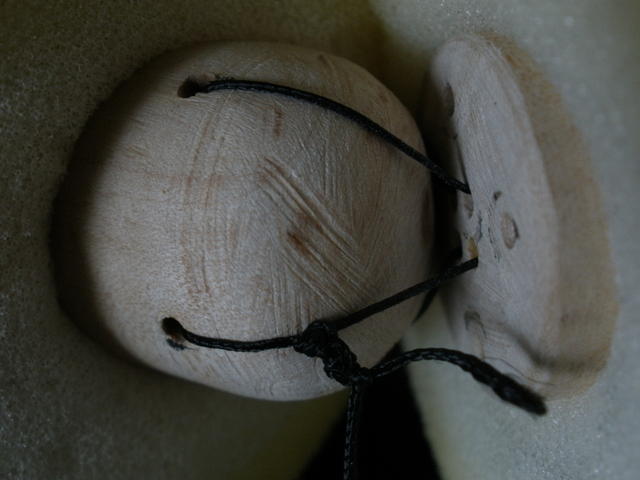
Still, I need good strong places to attach my strings, so I'm always happy to have more wood built into the puppet. The shapes for the spine are simply cut from dowel and then ground to shape with my Dremel. The centre section is just a flat slice of dowel. The outside pieces attach to other pieces of the skeleton. In the centre section you can see some of the four extra holes that I drilled closer to the edge of the vertebra. These are what we in the business call "speed holes." By removing unnecessary material from the puppet, it is made to go faster. Seriously, though, I just made a mistake. But I did use one of those speed holes to test a string later on.
After the spine I moved on to building the wings.
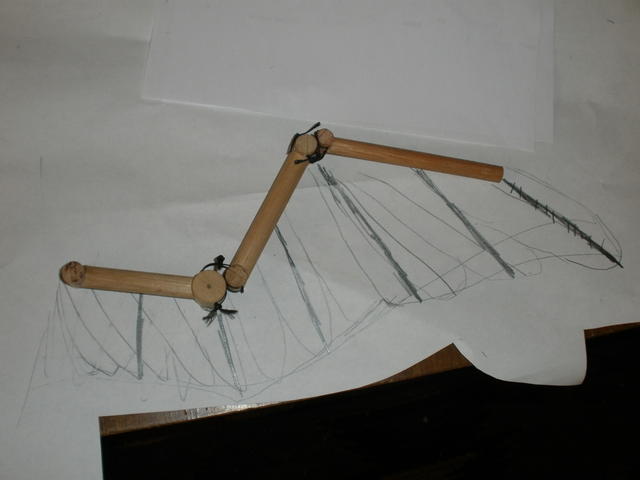
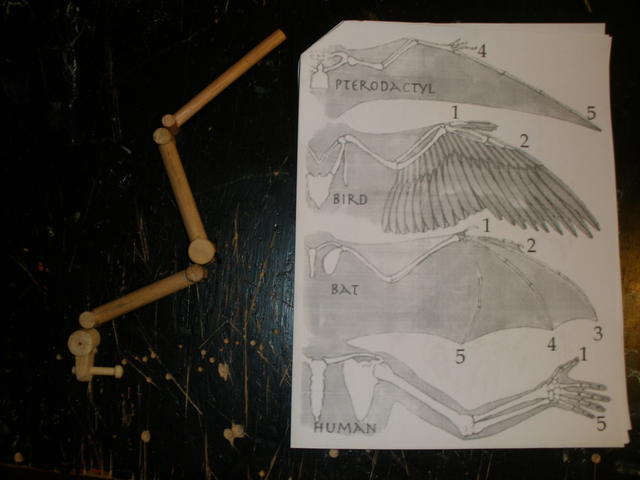
Well, wing, actually. I've found that it's best to make only one of any complicated mechanical piece until you're sure how it works. The wings will require the most figuring out of the whole puppet; I've made digitigrade legs, moving mouths, and quadrupeds, but I've never made wings that folded before. My research on the internet provided me with a little information on how this trick might be accomplished, but only on costume scale. I found one puppeteer who expressed frustration at the same problem, and many solutions if I wished to use computer animation. Pictures of bird wing bone structures are turning out to be the most useful information available. The rest I have to figure out myself.
Here's the little nubbin that is responsible for the up and down flapping of the wings:
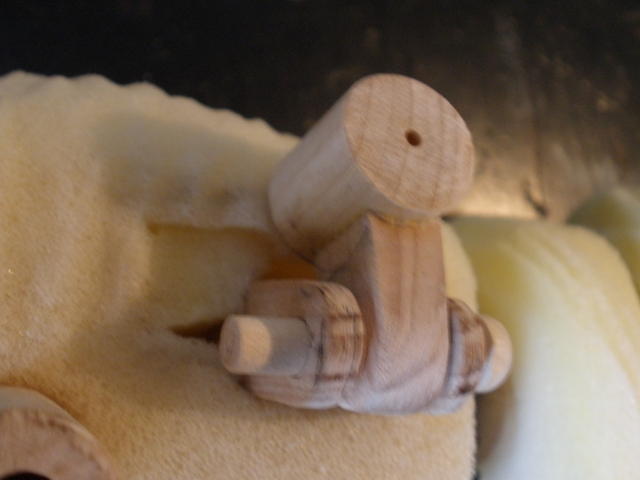
Pretty basic. And here's the joint that I improved for use on the wings:
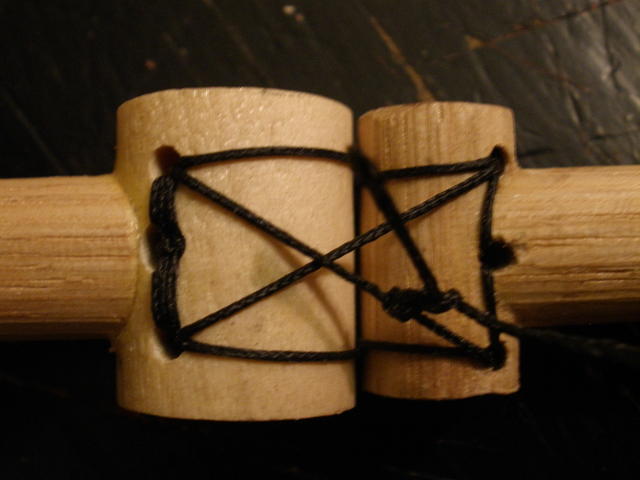
It doesn't allow as much twisting and play as the basic knee joints that I'm using, and it's a little more difficult to string
After I tied everything together, I started to experiment with getting the skeleton to do the motions that I planned for. Here's the whole mess of things including the temporary wing strings:
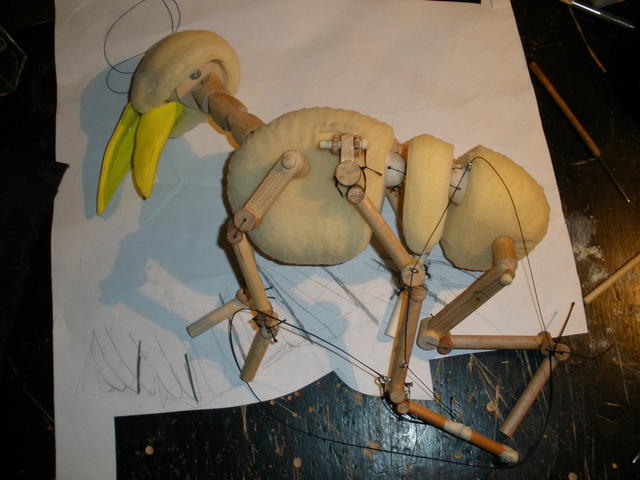
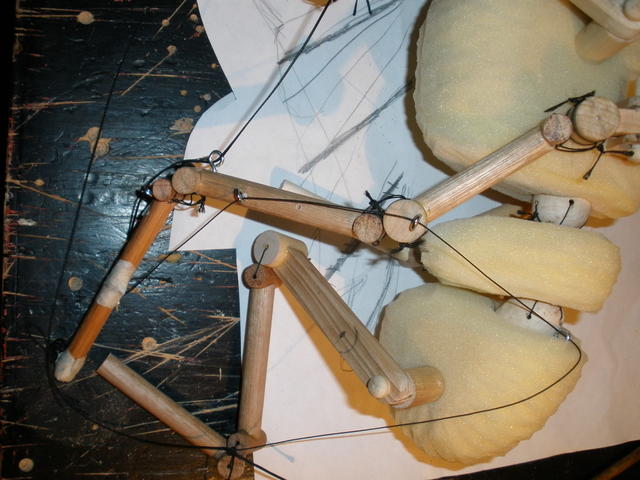
I really broke out the eye-rings on this one.
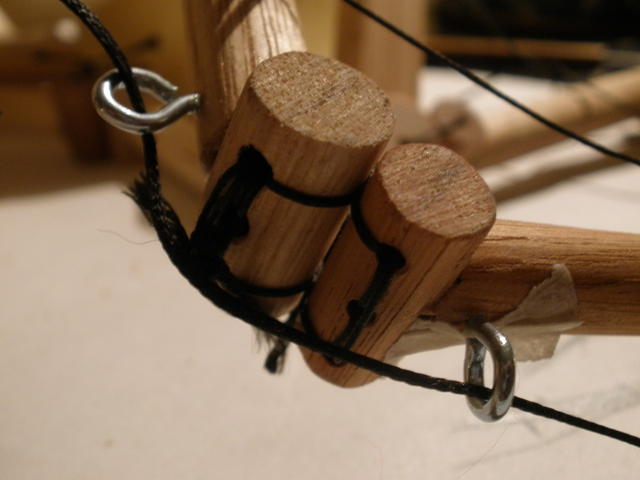
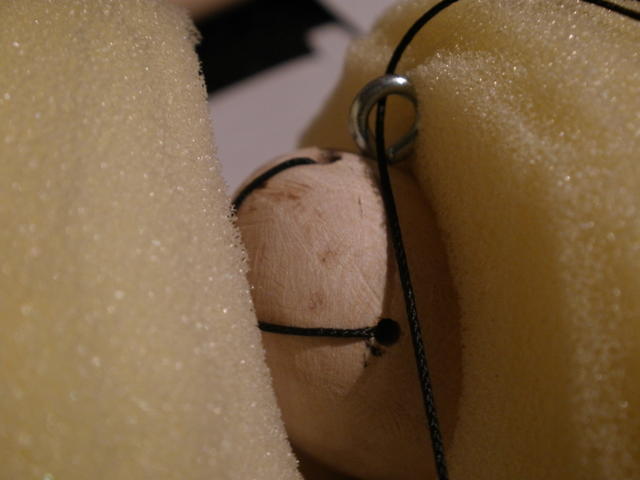
Hmm... I'm not really sure how to describe the workings of the wing. Um, The string that makes the wing flap attaches to the outmost piece of dowel, but then goes through two more eye-rings so that it heads up to the controller from the outer tip of the middle section. Tension on the string keeps the outer section of the wing spread outwards. The string's position gives a pretty good flapping motion, and conserves on the amount of string that needs to be pulled up to get a full flap. The other string pulls the whole wing structure towards the body. It starts in the middle of the outer wing section, passes through eye-rings in the other wing sections, then through an eye-ring on the spine and up to the controller. I've tied the end of these two strings together, seeing as the two strings work reciprocally; When one is pulled, the other must be slacked.
Wow! I'm excited! I just hope that everything works as well with the cloth "feathers" on as it all does right now. I might have to add some sort of spring to make the wings want to stay more open. I'm also considering adding some flexible feather spines to the wing bones to help support the fabric feathers. I also plan to add the string anchor-points soon. I want to see this thing move!
Still, I need good strong places to attach my strings, so I'm always happy to have more wood built into the puppet. The shapes for the spine are simply cut from dowel and then ground to shape with my Dremel. The centre section is just a flat slice of dowel. The outside pieces attach to other pieces of the skeleton. In the centre section you can see some of the four extra holes that I drilled closer to the edge of the vertebra. These are what we in the business call "speed holes." By removing unnecessary material from the puppet, it is made to go faster. Seriously, though, I just made a mistake. But I did use one of those speed holes to test a string later on.
After the spine I moved on to building the wings.
Well, wing, actually. I've found that it's best to make only one of any complicated mechanical piece until you're sure how it works. The wings will require the most figuring out of the whole puppet; I've made digitigrade legs, moving mouths, and quadrupeds, but I've never made wings that folded before. My research on the internet provided me with a little information on how this trick might be accomplished, but only on costume scale. I found one puppeteer who expressed frustration at the same problem, and many solutions if I wished to use computer animation. Pictures of bird wing bone structures are turning out to be the most useful information available. The rest I have to figure out myself.
Here's the little nubbin that is responsible for the up and down flapping of the wings:
Pretty basic. And here's the joint that I improved for use on the wings:
It doesn't allow as much twisting and play as the basic knee joints that I'm using, and it's a little more difficult to string
After I tied everything together, I started to experiment with getting the skeleton to do the motions that I planned for. Here's the whole mess of things including the temporary wing strings:
I really broke out the eye-rings on this one.
Hmm... I'm not really sure how to describe the workings of the wing. Um, The string that makes the wing flap attaches to the outmost piece of dowel, but then goes through two more eye-rings so that it heads up to the controller from the outer tip of the middle section. Tension on the string keeps the outer section of the wing spread outwards. The string's position gives a pretty good flapping motion, and conserves on the amount of string that needs to be pulled up to get a full flap. The other string pulls the whole wing structure towards the body. It starts in the middle of the outer wing section, passes through eye-rings in the other wing sections, then through an eye-ring on the spine and up to the controller. I've tied the end of these two strings together, seeing as the two strings work reciprocally; When one is pulled, the other must be slacked.
Wow! I'm excited! I just hope that everything works as well with the cloth "feathers" on as it all does right now. I might have to add some sort of spring to make the wings want to stay more open. I'm also considering adding some flexible feather spines to the wing bones to help support the fabric feathers. I also plan to add the string anchor-points soon. I want to see this thing move!
Re: Gryphon Marionette Posted by Abdolos on Mar 13, 2010
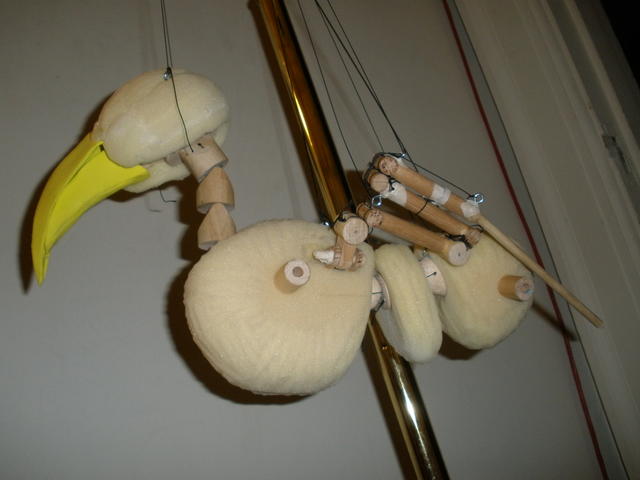
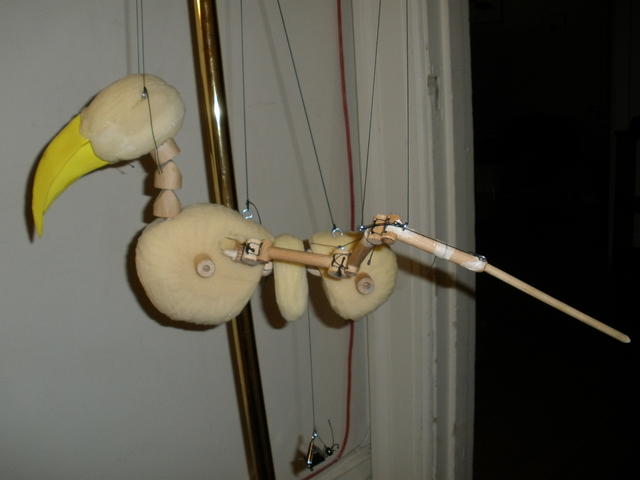
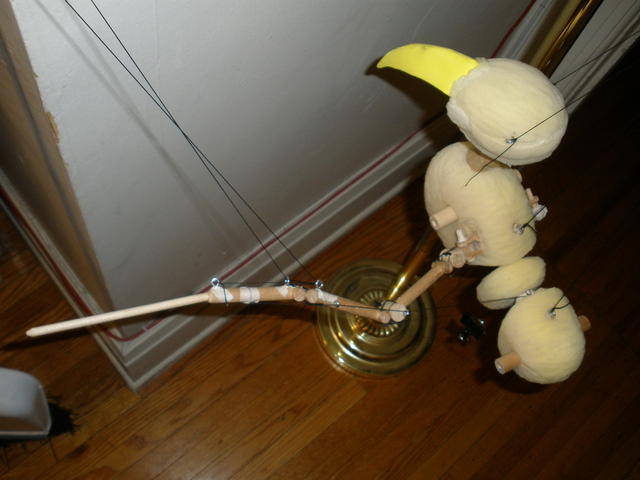
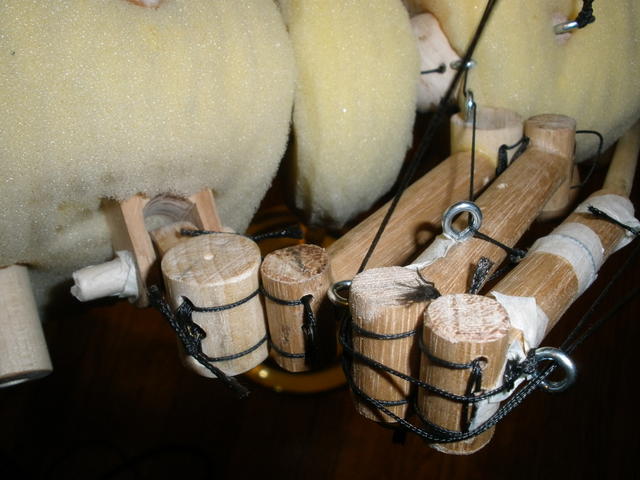
Yay! It's hanging from strings! Well, at least some of it is hanging from strings.


Re: Gryphon Marionette Posted by Helmut Schmidt on Mar 14, 2010
Hello
I have read your article in Puppets And Stuff to the theme "Gryphon puppet". Very good successful design. Have you had thoughts are already on the controller? Your project is very interesting.
With best regards
H. Schmidt
I have read your article in Puppets And Stuff to the theme "Gryphon puppet". Very good successful design. Have you had thoughts are already on the controller? Your project is very interesting.
With best regards
H. Schmidt
Re: Gryphon Marionette Posted by johian on Mar 14, 2010
Very well done indeed... The system on the wing looks very interesting. I'm also looking forward to see the result of the controller. I had some thinking to do on my dragons to move the wings but I'm not realy satisfied with the result. So I'm also trying out different things.
Johan
Johan
Re: Gryphon Marionette Posted by Shawn on Mar 14, 2010
Wow! I am impressed! Very well thought out. Great spin by the way, no need to apologize for not keeping it simple. 
I'm not real sure what you are using to string things together but keep in mind that the ones that run through your eye hooks well tend to wear. There is the possibility that one could break or fray over time so keep in mind repair as you move forward on this project. A stitch is easier to take out to allow access then when something is glued down.
I'm not real sure what you are using to string things together but keep in mind that the ones that run through your eye hooks well tend to wear. There is the possibility that one could break or fray over time so keep in mind repair as you move forward on this project. A stitch is easier to take out to allow access then when something is glued down.

Re: Gryphon Marionette Posted by Abdolos on Mar 15, 2010
Yes, Herr Schmidt, I have had some ideas for the controller. One of the ideas is included in the pages I photoed from my drawing book, included earlier in this thread. It uses the hand clenching & unclenching to flap the wings. Another idea I had was to make a piston that the thumb would push to work two long levers for the wings. Basically, it would look like the controller had wings, too. One of my habits in construction is to think up a lot of ideas, discarding whatever seems uninteresting. Sometimes I end up at the original design by the time construction is finished, and sometimes something that is altogether different.
Hey Johan, did that give you any ideas for your dragon? I'm still curious with a lot of other people about what you're going to do with your spider control. Looks like fun!
Thanks for the words of caution, Shawn. I'm actually afraid of making anything that can't be fixed. Who knows what will happen during the show?
Here's where I'm at now:
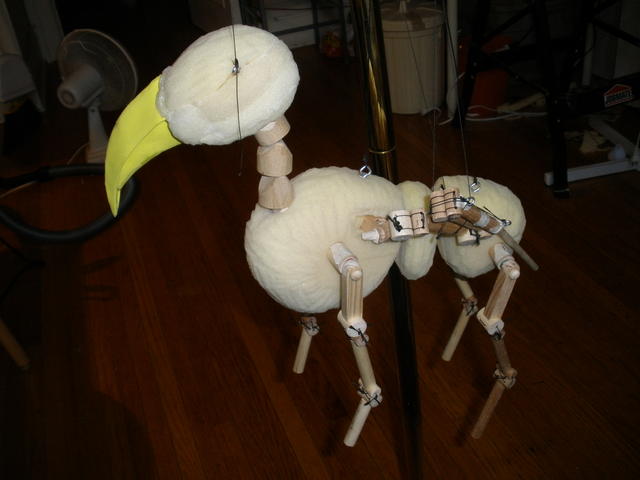
I used some cigar-box nails to attach the legs a little more permanently. I also shortened the top section of the lion legs, and added the joint-stops so that the legs hang with a little definition instead of in a limp straight line. My hands are pretty sore with all the knot-tying I've been doing over the last few days, I might need to take a break from construction. We'll see if I can do that.
Hey Johan, did that give you any ideas for your dragon? I'm still curious with a lot of other people about what you're going to do with your spider control. Looks like fun!
Thanks for the words of caution, Shawn. I'm actually afraid of making anything that can't be fixed. Who knows what will happen during the show?
Here's where I'm at now:
I used some cigar-box nails to attach the legs a little more permanently. I also shortened the top section of the lion legs, and added the joint-stops so that the legs hang with a little definition instead of in a limp straight line. My hands are pretty sore with all the knot-tying I've been doing over the last few days, I might need to take a break from construction. We'll see if I can do that.
Loading
No More Post
Error
Loading