Re: Gryphon Marionette Posted by Michael Poindexter on Apr 27, 2010
How's going with the Gryphon? Thanks for posting the documentation of the build.
I thought about your desire to have the joints expressed. I agree that it would be better to see the mechanisms.
How about paper clay attached to the wood between the joints? I'm not sure how well paper clay sculpts or attaches to wood having just seen the product online.
Do you think it would work? Does it adhere to foam?
It would be cool to be able to form muscles, skin textures and color between the joints and let the joints show the mechanisims.
Re: Gryphon Marionette Posted by Shawn on Apr 27, 2010
Yes Creative Paper Clay adhears to just about anything. The secret is to rough up the surface you are applying Creative Paper Clay to then use a bit of wood or white glue on the surface before you add the CPC. I use it over styro foam that has been covered in a thin layer of paper mache' all the time. I don't think it would work well on poly foam since it poly foam is flexible. Daryl uses the Crayola clay over foam to build up shapes and that works well for him on poly foam. I think the Crayola clay is a bit more flexible then CPC when it dries.
Re: Gryphon Marionette Posted by Jorge on Apr 28, 2010
I agree Shawn , you can work with Styrofoam instead of foam rubber. You can glue the styro to wood with white glue (carpenter's). I takes a whole day or two to dry, but works fine. then shape the Styrofoam with sand paper and cover with one layer or two of papier maché.
The main trouble is sanding the styro is quite dirty: you'll get lots of little white pieces. I try to sand inside a box, pick as much little pieces as possible, and then clean the box with the vacuum cleaner
The main trouble is sanding the styro is quite dirty: you'll get lots of little white pieces. I try to sand inside a box, pick as much little pieces as possible, and then clean the box with the vacuum cleaner
Re: Gryphon Marionette Posted by Abdolos on Apr 29, 2010
I've used a lot of paper clay on wood, and it works very well. To help the bond, I soak the wood piece for a little while (a minute or so) to help the clay wick into the wood. Also, I have used paper clay on foam rubber. The foam does give way a bit, but if you're patient you can make it work. This head was made over foam rubber, and a couple of years later I decided it would be fun to have a look inside:
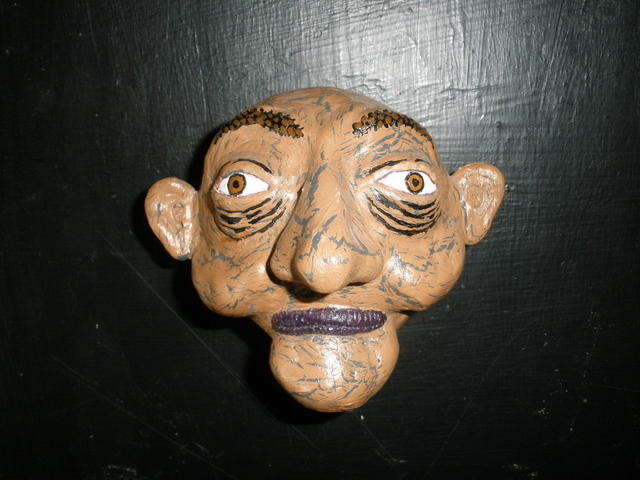
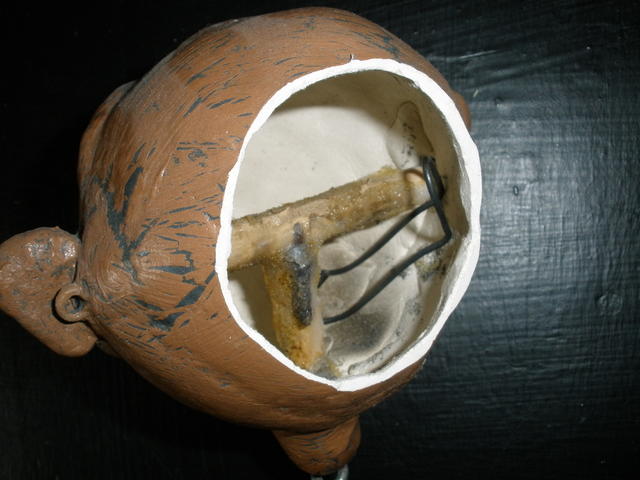
The original plan for the griffin was to build up the legs with foam rubber for some sections and paper clay for others. The only problem I have with paper clay is how expensive it is, but that's enough for me to avoid using it whenever possible. Still, you'll probably see me use at least some before this project is done.
The original plan for the griffin was to build up the legs with foam rubber for some sections and paper clay for others. The only problem I have with paper clay is how expensive it is, but that's enough for me to avoid using it whenever possible. Still, you'll probably see me use at least some before this project is done.
Re: Gryphon Marionette Posted by Abdolos on Apr 29, 2010
Here's the latest:
I started this post a while ago, but was experiencing network problems, so here are a few days of messing around with the project:
I spent a couple of days to get something that was almost the same as what I had before. I couldn't get the foam sliced thinly enough to cut the kind of slots I had in mind, but the hips did end up narrower than I had originally, which is good. Here is a before and after shot:
I recarved the foam three or four times to get something I was satisfied with. My laundry is covered with foam fragments.
One great advantage of the new joint is that it doesn't rub against any foam-rubber. It's all wood on wood action! Here're the pelvic bones without the foam-rubber:
I know, it looks kinda rude.
But here's the best part of the new pelvis: A secret compartment! I've been trying to make this whole puppet so that it can be seriously dismantled, so I need access to a lot of the interior. To get to the inside of the pegs that hold the hips on, I built this little space and trap-door to cover it:
This kinda goes against my "show all the joints" theory, but even if I left the space uncovered it couldn't really be seen. Besides, now a trap door is the mechanism that I'm showing off. How cool is that?
I carved a new abdomen today:
It fills in the space better than the original disc. I also reattached the tail and shortened the middle section of the lion-legs, but you can see that in a picture some other time.
Re: Gryphon Marionette Posted by Abdolos on May 04, 2010
Attached the tail. Finished the skeleton for the other hind leg. Adjusted proportions. But whatever. All the real action is in one crossed loop of string, and here it is:
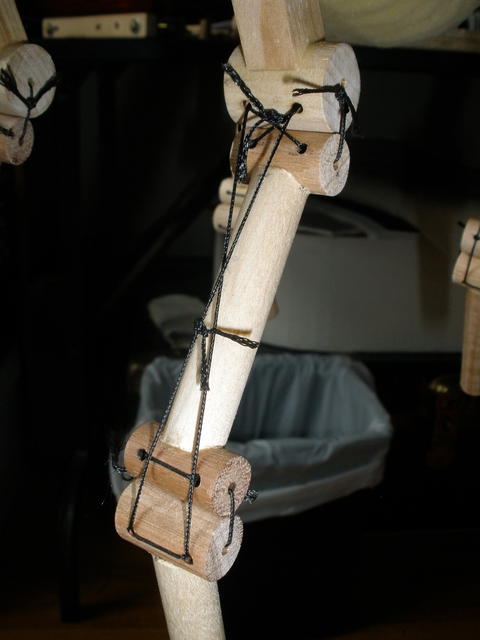
The best thing about this bit of string is that it uses preexisting holes to work. So what does it do? It prevents a sort of awkward motion. Before, when the leg was pushed up from underneath, it bent like this:
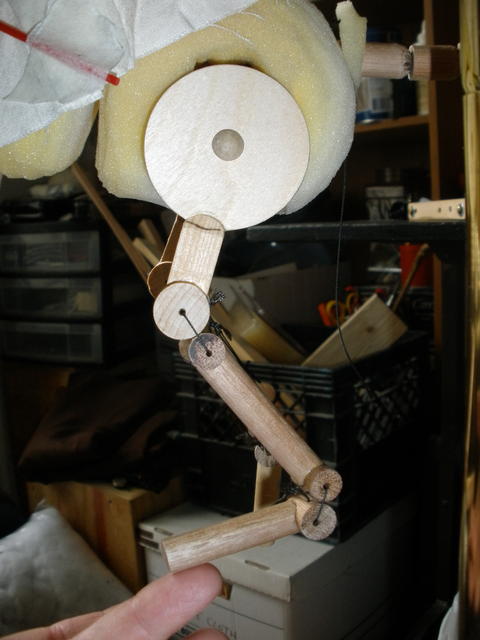
Which I thought looked kind of dumb. But with the loop of string attached, the two lower joints of the leg are forced to work together, so that when the leg is pushed up from underneath, it looks like this:
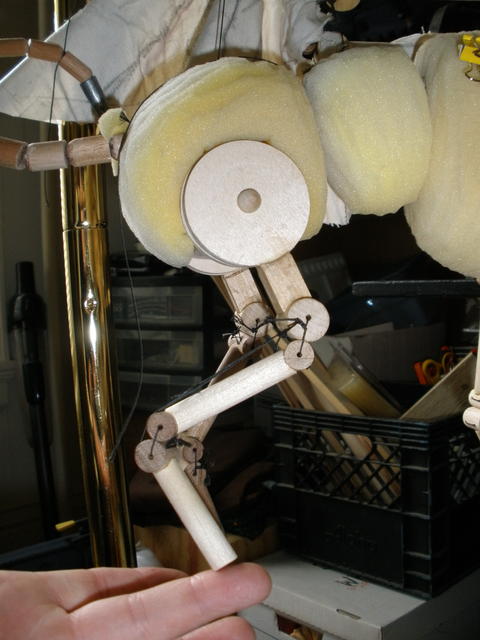
Which I think looks way more natural. And for once in my life, the inspiration was greater than the perspiration. Hooray!
The best thing about this bit of string is that it uses preexisting holes to work. So what does it do? It prevents a sort of awkward motion. Before, when the leg was pushed up from underneath, it bent like this:
Which I thought looked kind of dumb. But with the loop of string attached, the two lower joints of the leg are forced to work together, so that when the leg is pushed up from underneath, it looks like this:
Which I think looks way more natural. And for once in my life, the inspiration was greater than the perspiration. Hooray!
Re: Gryphon Marionette Posted by Na on May 07, 2010
It's looking very good. Can't wait to see the final product! I hope you post a video too, because I'd be interested in seeing how the legs work.
Re: Gryphon Marionette Posted by Sunbeatle Puppets on Aug 02, 2010
wow i cannot wait to see the finished gryphon!
Re: Gryphon Marionette Posted by Abdolos on Aug 11, 2010
Wow, did summer ever get busy! At the end of May I went to visit my sister in Portland, OR, and since then there has been all sorts of crazy things going on in Winnipeg. The Puppet Apocalypse, Winnipeg's first puppet slam, happened at the beginning of July, and I spent all of June splitting my time between working my labour job and preparing a ten minute puppet play based on situation 23 of Georges Polti's 36 Dramatic Situations. The day of the puppet slam I had another job during the day, which was to show some a bunch of young teens my puppets to inspire them for an installation they were planning and building for the Winnipeg Folk Festival. That first day turned into work for most of the rest of the week helping the students to build their ideas. I was getting sick all that time, and I stayed sick for almost three weeks! Lots of other work at all hours from the stagehanding job in July and August, and now things are settling down just a little bit. Blah, blah, blah. Time for an update!
I've been concentrating on the legs in my few moments of building lately. Here are my advancements on the lion legs:
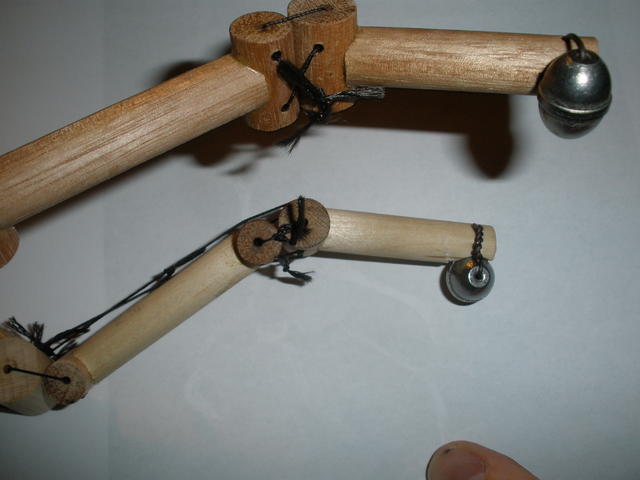
First, I added weights so they wouldn't seem all light and fluttery:
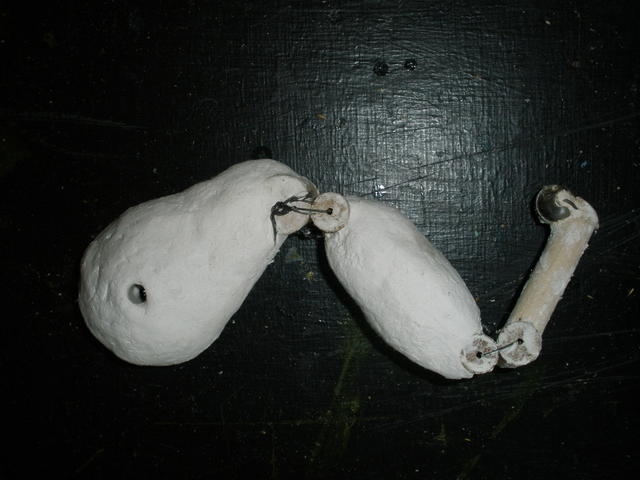
Then I built the shape up using Fast Mache. I haven't used that material before, but I'm happy with the result:
The lower segment is not made here because I decided that the claws needed to be made out of some stronger material. They're small and they will keep hitting the stage, so I started by using the old nails-in-a-board template to twist some wire into armature:
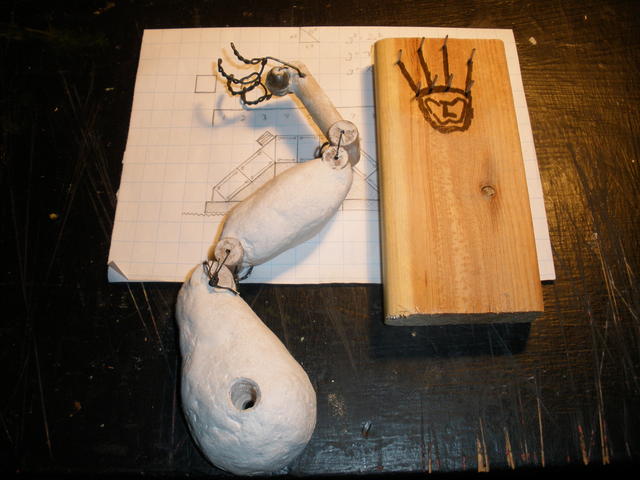
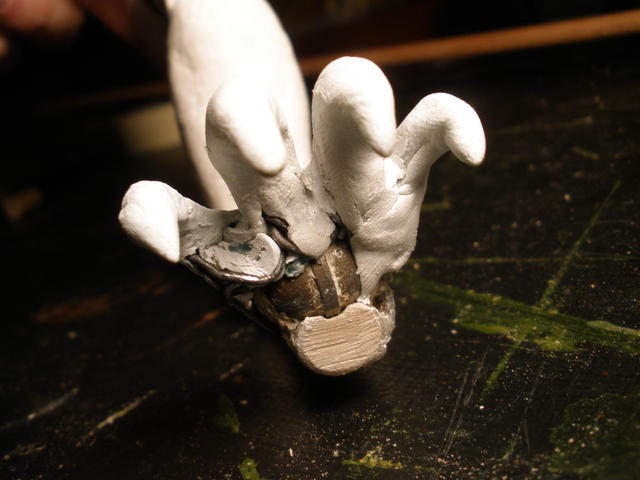
After the armature was done, I built on top of it with epoxy putty:
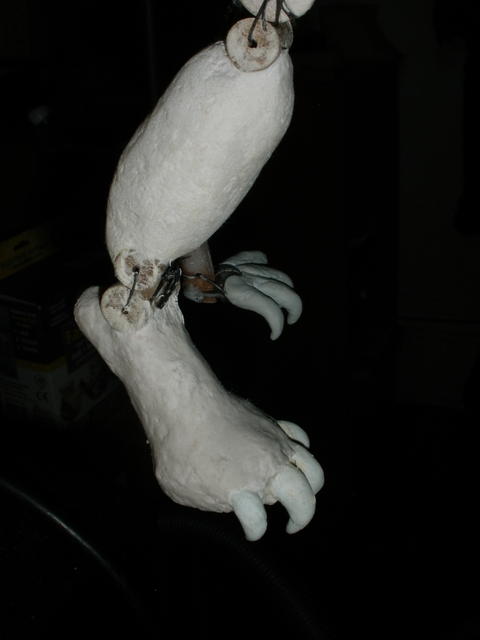
And finally (for now), I built up the form around the claws with more Fast Mache:
I've also been working a bit on the bird feet. First, some nails-in-a-board wire armature:
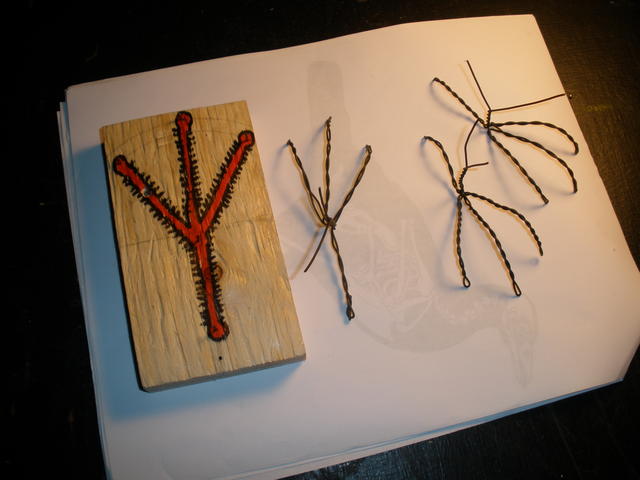
The extra claw in this picture is a prototype; it has a rear toe that's too long. The armature made me realize that the feet are too big for my original plan, which was to have them rigidly connected to the lower legs. Instead, I built a simple wrist joint so the claws can adjust to any grade or irregularity, and just move more fluidly:
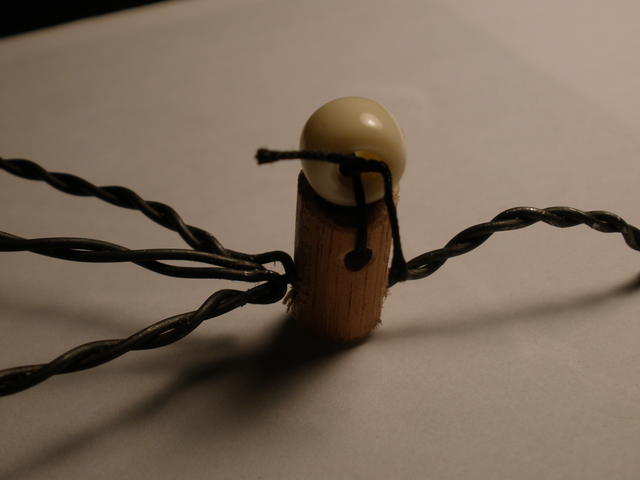
Simple is good, and when you have so little space to play in, simplicity is the only option.
I've been concentrating on the legs in my few moments of building lately. Here are my advancements on the lion legs:
First, I added weights so they wouldn't seem all light and fluttery:
Then I built the shape up using Fast Mache. I haven't used that material before, but I'm happy with the result:
The lower segment is not made here because I decided that the claws needed to be made out of some stronger material. They're small and they will keep hitting the stage, so I started by using the old nails-in-a-board template to twist some wire into armature:
After the armature was done, I built on top of it with epoxy putty:
And finally (for now), I built up the form around the claws with more Fast Mache:
I've also been working a bit on the bird feet. First, some nails-in-a-board wire armature:
The extra claw in this picture is a prototype; it has a rear toe that's too long. The armature made me realize that the feet are too big for my original plan, which was to have them rigidly connected to the lower legs. Instead, I built a simple wrist joint so the claws can adjust to any grade or irregularity, and just move more fluidly:
Simple is good, and when you have so little space to play in, simplicity is the only option.
Re: Gryphon Marionette Posted by Gimpdiggity on Aug 11, 2010
Great thread. I like the concept, and it looks like it's coming together just great!!
Loading
No More Post
Error
Loading