New guy, new first puppet! Now with added Nose Pattern! Posted by Coz_UK on Jul 05, 2012
Hey folks!
First off, meet Nino! He's currently my roomy. He tells me he has a famous cousin in the States on some TV show, but I think he's pulling my leg.
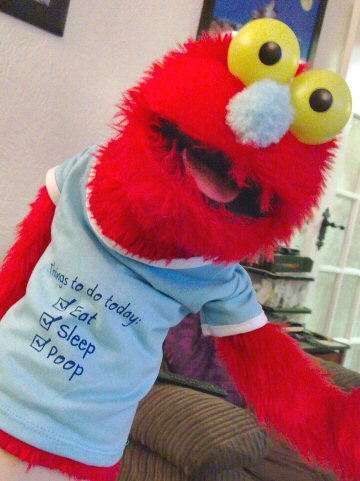
He thinks that tee is really funny. He would.
He's currently awaiting an eye transplant to some whiter eyeballs. He's got kind of a jaundiced view on everything at the moment.
He's sort of a 'mutt' or a Bitza puppet (bitza this, bitza that...) made to practice my puppet buildingninja powers uh, skills.
He's made of red fake fur (I won't say 'faux' as it isn't even trying to look real!) from the craft store with a felt mouth lining (it was quick and cheap, okay? Sheeesh).
His head is from the Blatch pattern (available everywhere via your local internet) unaltered bar the addition of a slightly fuller mouthplate.
The mouthplate was made of two pieces of stiff grey cardstock onto 1/4" yellow foam. The card was covered with polar fleece glued down over a trimmed makeup sponge for finger positioning.
I then added fleece pockets to hold the fingers and thumb in place - I folded the fleece around two 1/4" foam 'D' shapes, and stitched it all together.
This, you might already know, makes it incredibly hot after 2.7 seconds (approx.) - I'll try a different method next time! I created a hand sauna.
The body is the Project Puppet Simple puppet pattern body, with no mods (don't worry, the rest of the pattern is gonna see a fair bit of use too! I've got, like, all of the downloadable ones now - I'm kinda spoiled for choice!).
Alright, I'll 'fess up - the arm pattern I found on here in Billy D. Fullers' Gallery Album. Sorry!
But it's a great pattern, mate!
I altered the pattern to make the arms narrower, and shortened it a bit - tho it coulda been the size I printed it out at.
Sorry for messin' with your pattern, Billy!
The hands I wanted to make poseable, so I used the Project Puppet instructions and tailor made a foam pattern for the hands with a custom palm support. I used 1/2 and 1/4 inch foam for this, as two 1/2" pieces woulds been too thick to fit, I thought.
Amazingly, I was right! I had to sit down.
At this point I realised I had a choice - fixed or removable rods? Well, in for a penny...
Removable it was - just gluing 'em on seemed a bit churlish by this point. But the doll joints I had were too big for the hands - what to do?
To be continued!
First off, meet Nino! He's currently my roomy. He tells me he has a famous cousin in the States on some TV show, but I think he's pulling my leg.
He thinks that tee is really funny. He would.
He's currently awaiting an eye transplant to some whiter eyeballs. He's got kind of a jaundiced view on everything at the moment.
He's sort of a 'mutt' or a Bitza puppet (bitza this, bitza that...) made to practice my puppet building
He's made of red fake fur (I won't say 'faux' as it isn't even trying to look real!) from the craft store with a felt mouth lining (it was quick and cheap, okay? Sheeesh).
His head is from the Blatch pattern (available everywhere via your local internet) unaltered bar the addition of a slightly fuller mouthplate.
The mouthplate was made of two pieces of stiff grey cardstock onto 1/4" yellow foam. The card was covered with polar fleece glued down over a trimmed makeup sponge for finger positioning.
I then added fleece pockets to hold the fingers and thumb in place - I folded the fleece around two 1/4" foam 'D' shapes, and stitched it all together.
This, you might already know, makes it incredibly hot after 2.7 seconds (approx.) - I'll try a different method next time! I created a hand sauna.
The body is the Project Puppet Simple puppet pattern body, with no mods (don't worry, the rest of the pattern is gonna see a fair bit of use too! I've got, like, all of the downloadable ones now - I'm kinda spoiled for choice!).
Alright, I'll 'fess up - the arm pattern I found on here in Billy D. Fullers' Gallery Album. Sorry!
But it's a great pattern, mate!
I altered the pattern to make the arms narrower, and shortened it a bit - tho it coulda been the size I printed it out at.
Sorry for messin' with your pattern, Billy!
The hands I wanted to make poseable, so I used the Project Puppet instructions and tailor made a foam pattern for the hands with a custom palm support. I used 1/2 and 1/4 inch foam for this, as two 1/2" pieces woulds been too thick to fit, I thought.
Amazingly, I was right! I had to sit down.
At this point I realised I had a choice - fixed or removable rods? Well, in for a penny...
Removable it was - just gluing 'em on seemed a bit churlish by this point. But the doll joints I had were too big for the hands - what to do?
To be continued!
Re: New guy, new first puppet! Now with added Nose Pattern! Posted by Shawn on Jul 05, 2012
Your right I think the famous cousin line is just for the ladies.  Looking good... I like your back story!
For those who are not familiar with the Blatch pattern (I wasn't) here it is. http://puppetbuzz.com/2007/06/21/the-purple-necked-black-bearded-blatch-with-full-size-pattern-download/
For those who are not familiar with the Blatch pattern (I wasn't) here it is. http://puppetbuzz.com/2007/06/21/the-purple-necked-black-bearded-blatch-with-full-size-pattern-download/
Re: New guy, new first puppet! Now with added Nose Pattern! Posted by Billy D. Fuller on Jul 05, 2012
Alright, I'll 'fess up - the arm pattern I found on here in Billy D. Fullers' Gallery Album. Sorry!
But it's a great pattern, mate!
I'm glad you could use it. That is why they are in the gallery. I'm impressed you were able to use all the different pattern pieces and get them to work together. Great job!
Re: New guy, new first puppet! Now with added Nose Pattern! Posted by Coz_UK on Jul 05, 2012
Thanks Billy! It was actually quite simple (it must've been - I could do it! ).
Shawn, thanks! Yep, that's the one - sort of a proto-Fraggle, I guess!
Aaaand we're back.
I'd read and understood the Puppet Planet website instructions for removable arm rods, which seemed the best option. I'd already bought a bag of doll joints to attatch the arms - only they were about as big as the hands were!
So do I Dremel down the doll joints? I guess I could just cut off the edge to a palm support shape, then drill holes for the finger wires, thus eliminating a step.
Very tempting, but I was sure I had something similar to doll joints...
Jean buttons! Replacement ones, actually. Metal cap, plastic body, spikey rivet to hammer in. From the fabric store. Cool.
It was so crazy it just might work.
NOTE: To calm those of a nervous disposition, please relax in the knowledge that it did actually work! And even better, still does!
I'd already custom made palm support pieces from two layers of that grey cardstock. I then reinforced it by coating them with a layer of Super Glue (Cyanoacrylate). Hardens the outside of the card like a coat of resin, pretty much.
Yeah, probably didn't need to do this, but it made me feel better about using card in there).
I made a hole in the palm support piece, and pushed the metal spikey rivet through it. Then I laid a piece of red felt in there to stop the end of the rod ripping out clumps of foam.
Stop - hammer time!
Smacked the button part onto the rivet, making sure it was fixed good and solid. I hot glued the rivet to the palm support, and added a few drops of Super Glue to the base of the button to stop it from turning.
Fingers were made from twisted garden wire, trimmed to size and glued in with both superglue and hot glue, then I used Contact Adhesive to stick the foam hand pieces together, sandwiching the palm support and the button in its red felt cocoon.
As I said earlier, I used 1/4 and 1/2 inch foam for the hand pieces, with the 1/2" piece on the outside. I followed the Project Puppet hand tutorial step by step, and found that the difference in foam thickness didn't make any difference at all.
If it wasn't for my dirty glue fingers, the puppet foam hands woulda looked just like the examples on PPs website.
I'd already sewn up the arms, but I'd left part of the hand seam open to insert the foam hand. Tight fit, and I worried about tearing the foam fingers, but they got in there without much trouble.
I skipped stuffing the arms - I liked that floppy Grover-ish look to them. The arms were fitted to the body with doll joints, as seen in a couple of How-To vids on YouTube, but I didn't think just gluing the fabric to the doll joint washer was gonna cut it.
So, I got some extra-strong thread and basically made the top of the arm into a coin purse opening (or if you want to be coarse, a sphincter). Perfect!
Next up, the face! Oh, and that nose pattern.
Re: New guy, new first puppet! Now with added Nose Pattern! Posted by Coz_UK on Jul 05, 2012
I had to look out for some eyes, and sniff out a nose too. As for his tongue, I had that licked. Ahem.
Using a few online pic references, I drew up a throat & tongue (even tho I'd used black for inside the mouth, I'd get use out of the throat on other projects).
Here ya go:
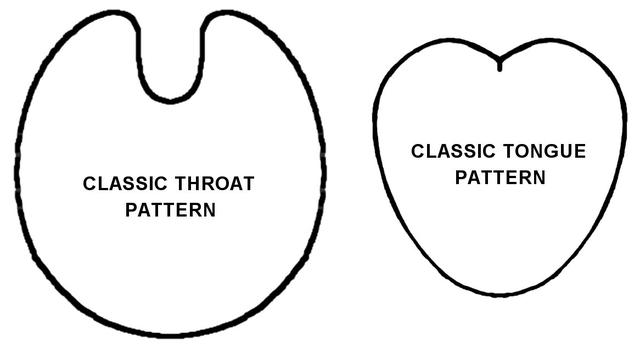
I just used the tongue pattern and some pink felt (actually did it twice - the first pink was too pale, and looked washed out what with all the red). Just glued it in there ("You've got a tongue. I should know, I stuck it there myself!" ).
So now a nose needed to be picked. >cough<
I wanted that egg / pear shaped nose seen throughout Muppetdom. But Nino's only a little guy, and finding something so small the right shape was tricky.
I'd found a light blue fur pencil case at a Pound Shop (think Dollar Store but with more junk). The fur is more of a fuzzy 'pile', which would hide any stitching better than the polar fleece I was gonna use.
So now I had to figure out a pattern for the nose. Simple, right? I was stumped. If Nino ever needed glasses, they'd just slide off his face!
I found a pattern online for a fabric easter egg, and that gave me an idea (yeah, it hurt).
I hadn't thought to make the nose like a foam head pattern.
After a little tinkering, this was my pattern:
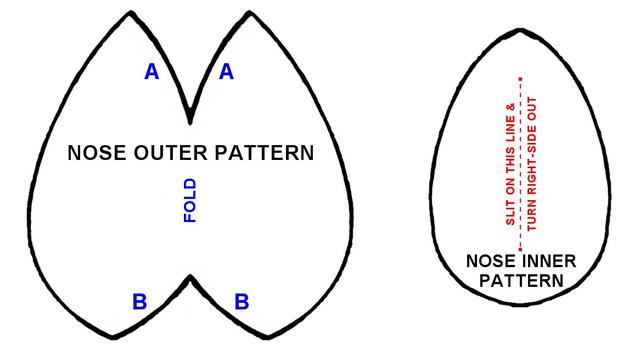
BTW: Check my Album in the Gallery for the patterns - they seem smaller here for some reason.
On the back of the nose 'outer' fabric (in my case, fuzzy fur), sew A to A, and B to B. With the nose still inside out, sew on the back 'inner' part.
Now slit the center line on the Inner, and turn the nose right-side out.
Pick the nose (hah!) seams free of caught fur. Stuff with polyfil (I slaughtered an old pillow), and stitch up the slit. Squish the nose around to even out the shape.
I stitched the nose to the barely visible centre seam of the face, putting stitches through the already sewn center slit for strength, and to help alignment.
Now Nino smells. Heh.
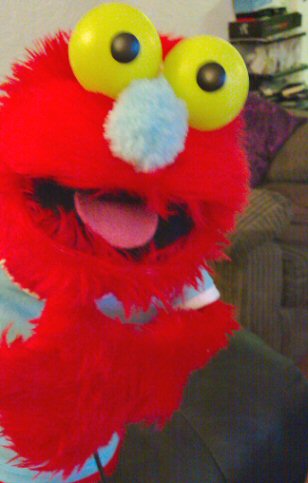
While I was in the Pound Shop, I nudged aside the zombies long enough to spy a ball-firing gun capable of distances of up to six inches. It had two yellow ping-pong sized balls made of that soft plastic only manufactured in China. Bingo!
I epoxied a short piece of thick wire into the premade molding holes one one side of each ball, then added more glue and joined them bothin holy matrimony together.
Once the glue set, I wrapped thread around where the join was, and tacked it tightly to Ninos' head, wrapping extra thread around the stitching before knotting it off.
This stops the eyes wobbling about so much.
As a bonus I can position the eyes to look up or down (the addition of a finger-operated lever and eyelids would make the eyes seem to blink or close).
Pupils were trimmed from good quality black electrical tape.
TIP: If you have any stickers or something with removable backing - save a piece! Stick the tape to that and it's a heck of a lot easier to draw out circles onto and cut out pupils with scissors.
The t-shirt is actually one made for very small dogs! I found it in the Pound Shop. Wretched hive of scum and villainy, but they have some useful stuff.
Oh, the arm rod (not pictured) I made from 3/32 inch Piano Wire epoxied into the dowel handle from a foam paint / glue brush. I added black heat-shrink tubing to the wire because it doesn't scratch off like paint. Also, its cool.
I added a screw-in eyehook to the end so it can be hung up, or to add a wrist loop.
Thanks for reading this essay! It was completely unintentional, but I seem to have verbal diarrhea of the fingertips.
If you got this far, go have a drink. You've earned it!
Cheers,
Coz.
Using a few online pic references, I drew up a throat & tongue (even tho I'd used black for inside the mouth, I'd get use out of the throat on other projects).
Here ya go:
I just used the tongue pattern and some pink felt (actually did it twice - the first pink was too pale, and looked washed out what with all the red). Just glued it in there ("You've got a tongue. I should know, I stuck it there myself!" ).
So now a nose needed to be picked. >cough<
I wanted that egg / pear shaped nose seen throughout Muppetdom. But Nino's only a little guy, and finding something so small the right shape was tricky.
I'd found a light blue fur pencil case at a Pound Shop (think Dollar Store but with more junk). The fur is more of a fuzzy 'pile', which would hide any stitching better than the polar fleece I was gonna use.
So now I had to figure out a pattern for the nose. Simple, right? I was stumped. If Nino ever needed glasses, they'd just slide off his face!
I found a pattern online for a fabric easter egg, and that gave me an idea (yeah, it hurt).
I hadn't thought to make the nose like a foam head pattern.
After a little tinkering, this was my pattern:
BTW: Check my Album in the Gallery for the patterns - they seem smaller here for some reason.
On the back of the nose 'outer' fabric (in my case, fuzzy fur), sew A to A, and B to B. With the nose still inside out, sew on the back 'inner' part.
Now slit the center line on the Inner, and turn the nose right-side out.
Pick the nose (hah!) seams free of caught fur. Stuff with polyfil (I slaughtered an old pillow), and stitch up the slit. Squish the nose around to even out the shape.
I stitched the nose to the barely visible centre seam of the face, putting stitches through the already sewn center slit for strength, and to help alignment.
Now Nino smells. Heh.
While I was in the Pound Shop, I nudged aside the zombies long enough to spy a ball-firing gun capable of distances of up to six inches. It had two yellow ping-pong sized balls made of that soft plastic only manufactured in China. Bingo!
I epoxied a short piece of thick wire into the premade molding holes one one side of each ball, then added more glue and joined them both
Once the glue set, I wrapped thread around where the join was, and tacked it tightly to Ninos' head, wrapping extra thread around the stitching before knotting it off.
This stops the eyes wobbling about so much.
As a bonus I can position the eyes to look up or down (the addition of a finger-operated lever and eyelids would make the eyes seem to blink or close).
Pupils were trimmed from good quality black electrical tape.
TIP: If you have any stickers or something with removable backing - save a piece! Stick the tape to that and it's a heck of a lot easier to draw out circles onto and cut out pupils with scissors.
The t-shirt is actually one made for very small dogs! I found it in the Pound Shop. Wretched hive of scum and villainy, but they have some useful stuff.
Oh, the arm rod (not pictured) I made from 3/32 inch Piano Wire epoxied into the dowel handle from a foam paint / glue brush. I added black heat-shrink tubing to the wire because it doesn't scratch off like paint. Also, its cool.
I added a screw-in eyehook to the end so it can be hung up, or to add a wrist loop.
Thanks for reading this essay! It was completely unintentional, but I seem to have verbal diarrhea of the fingertips.
If you got this far, go have a drink. You've earned it!
Cheers,
Coz.
Re: New guy, new first puppet! Now with added Nose Pattern! Posted by Rikka on Jul 06, 2012
Wow. You are so industrious!
Re: New guy, new first puppet! Now with added Nose Pattern! Posted by Shawn on Jul 06, 2012
Bravo! I enjoyed reading your post. I love how you write!
Do not despair... the images are shrunk so they fit on the page better but if you click on the image it pops up full size in a little window.
BTW: Check my Album in the Gallery for the patterns - they seem smaller here for some reason.
Do not despair... the images are shrunk so they fit on the page better but if you click on the image it pops up full size in a little window.
Re: New guy, new first puppet! Now with added Nose Pattern! Posted by Coz_UK on Jul 06, 2012
Thanks Shawn! I try to be informative and entertaining - can't think where I got that from... 
Thanks Rikka!
C.
Thanks Rikka!
C.
Re: New guy, new first puppet! Now with added Nose Pattern! Posted by StiqPuppet Productions on Jul 07, 2012
@ Coz_UK glad you provided those patterns I am sure there are many out there that struggle a bit to get them to look even and stuff. The nose pattern looks great...thanks for posting them for all to share.
StiqPuppets
StiqPuppets
Re: New guy, new first puppet! Now with added Nose Pattern! Posted by Lizzies Lair on Jul 07, 2012
An awesome read and an awesome puppet!
Loading
No More Post
Error
Loading