Re: Pippa Pup - first build! Posted by Shirik on May 14, 2013
I had a sudden rush order come in yesterday right after I made my last post so shes being put on hold for a few days sadly, will probably pick her back up on Monday
Re: Pippa Pup - first build! Posted by Shawn on May 15, 2013
Gotta keep food on the table... we understand. 
Re: Pippa Pup - first build! Posted by Shirik on May 15, 2013
Waiting on some supplies for my rush order, done what I can on it until the needed stuff arrives.... so more Pippa happened!!
Both her ears got sewn first today, such tiny little spots <3 I love them :D The ears ended up a lot more "perked collie" than floppy like originally drafted - but I like them! the "collie" ears are staying! She's a mongrel, she's meant to be a bit random
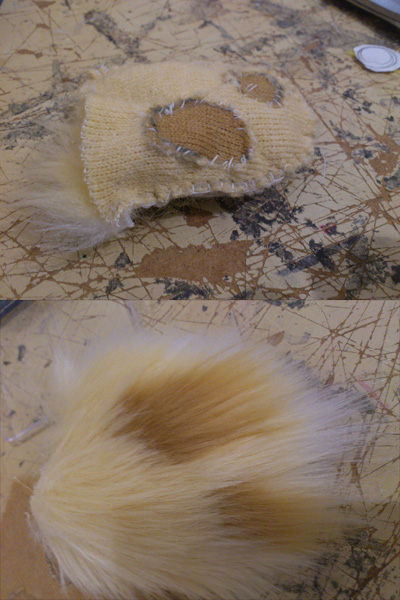
The ears then got sewn directly into the face "skin" to make positioning them easier.
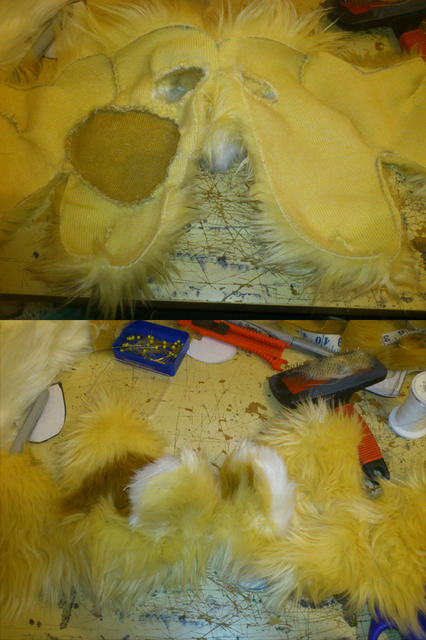
Inner mouth got sewn to the face skin, mouth plate was added (not pictured) - instead of the stiff felt/chipboard recommend by Project Puppet I used styrene sheet plastic. Wonderful stuff I use a fair bit of . Photos are prior to the skin being glued down and shaved.
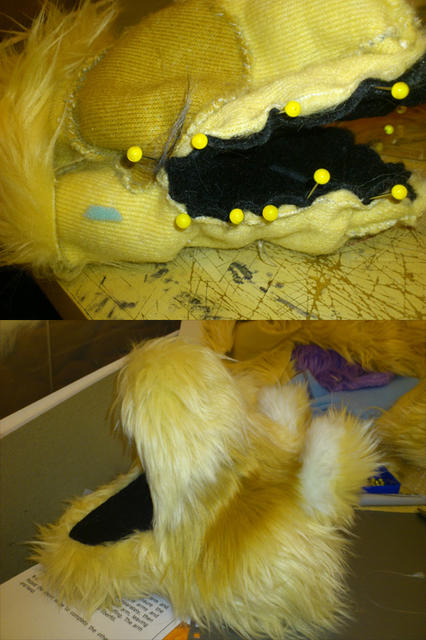
All glued down and shaved now! with a nose added in as well, I may redo the nose as not 100% happy with it.
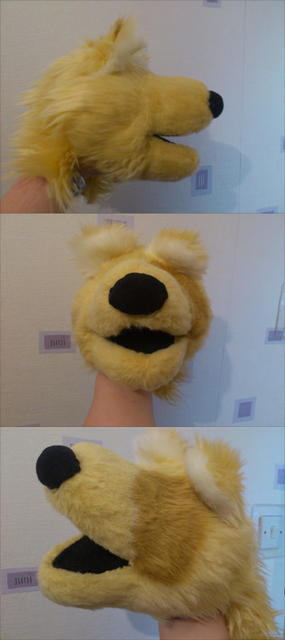
She needs a bit more shaving and tweaking - the muzzle hasn't been shaved perfectly and the excess fluff is making it look wonky from a front view. Need to try and fix that. Also her back of head/neck isn't sewn in just yet - I wanted to wait for my much larger handed husband to get home to try her for size, she fits me with a fair bit of wiggle room but wanted to make sure she would fit someone with a decent hand size before adding any neck. I have teeny tiny hands.
My materials for my rush order are estimated to be with me for Monday (alas was the fastest I could get them shipped ) so I'll be carrying on with Pippa in the meantime!
Both her ears got sewn first today, such tiny little spots <3 I love them :D The ears ended up a lot more "perked collie" than floppy like originally drafted - but I like them! the "collie" ears are staying! She's a mongrel, she's meant to be a bit random

The ears then got sewn directly into the face "skin" to make positioning them easier.

Inner mouth got sewn to the face skin, mouth plate was added (not pictured) - instead of the stiff felt/chipboard recommend by Project Puppet I used styrene sheet plastic. Wonderful stuff I use a fair bit of

All glued down and shaved now! with a nose added in as well, I may redo the nose as not 100% happy with it.

She needs a bit more shaving and tweaking - the muzzle hasn't been shaved perfectly and the excess fluff is making it look wonky from a front view. Need to try and fix that. Also her back of head/neck isn't sewn in just yet - I wanted to wait for my much larger handed husband to get home to try her for size, she fits me with a fair bit of wiggle room but wanted to make sure she would fit someone with a decent hand size before adding any neck. I have teeny tiny hands.
My materials for my rush order are estimated to be with me for Monday (alas was the fastest I could get them shipped
 ) so I'll be carrying on with Pippa in the meantime!
 Re: Pippa Pup - first build! Posted by Rich D. on May 15, 2013
She's turning out pretty well. Looking forward to seeing more 
Re: Pippa Pup - first build! Posted by Na on May 16, 2013
Looks great! I love the use of the different coloured furs.
Re: Pippa Pup - first build! Posted by Shawn on May 16, 2013
Very nice! I would like to point out to everyone the use of different furs make "spots". Notice how Shirik has cut out a small circle from the base fur and inserted a small contrasting color of fur? Also note that she has shaved down the fur for the muzzle. Both these techniques really add depth and texture to a puppet made with fur and I encourage others to give it a try! 
Re: Pippa Pup - first build! Posted by Shirik on May 16, 2013
Fully agreeing with Shawn here! Fur can be a bit daunting to use initially but once you learn to tame it, its wonderful! :D For shaving I just use cheap value style mens hair clippers on the lowest guard for most of iit then I get a bit brave and go guardless (I recommend trying this on some scrap first before going straight at your puppet!)
Supplies for my rush order still not here - did some more work on Pippa! I would be doing this build a lot faster if my sewing machine wasn't out of action - she's being done 100% handsewn and I'm a bit out of practice speed wise!
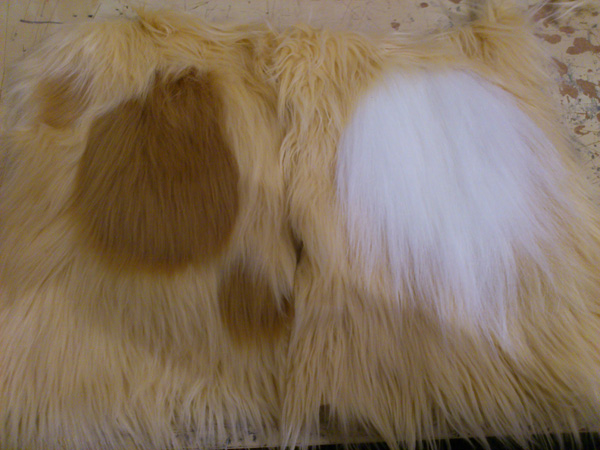
Both body panels - Again Ive deviated from the concept art, added more spots to the back than initially intended and added less ivory to the front. The fur used on the front is EXTRA FLUFFY to add some varying texture to the puppet.
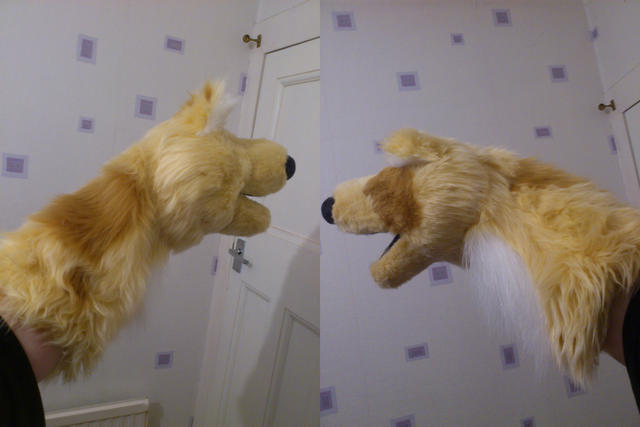
Body sewn together and attached to the head!

TAIL! I used the extyra fluffy fur again on the underside of the tail and added less spots than the concept art. Basically I pretty much swapped the spot patterns on the back and tail and I think it looks much better!
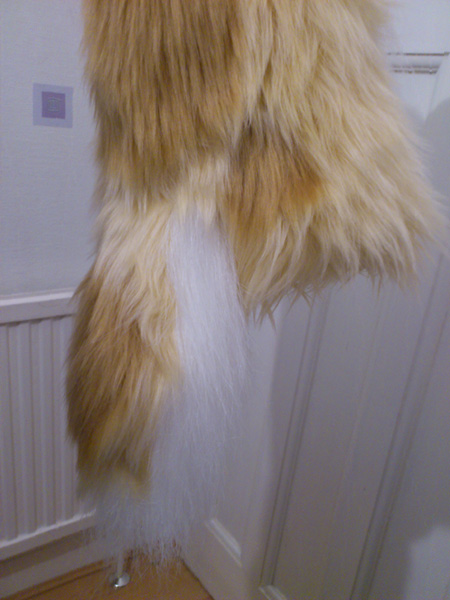
Tail attached to body - to do this I measured where I wanted the base of the tail to be and cut a slit the width of the top of the tail. I sandwiched the tail into the slot and sewed through all the layers with a backstitch twice before blanket stitching a third layer of stitching to neaten it up a bit.
I got started on her arms today but didn't finish them, hence no pictures. My arm rods are in the mail (yes I bought pre made rods for this project - didn't have the time to make my own sadly) and will hopefully be here soon.
I'm not sure what to do about giving her legs or not in all honesty, I don't think she -needs- legs but it may turn in to a "if I have time" thing. Thoughts?
Supplies for my rush order still not here - did some more work on Pippa! I would be doing this build a lot faster if my sewing machine wasn't out of action - she's being done 100% handsewn and I'm a bit out of practice speed wise!

Both body panels - Again Ive deviated from the concept art, added more spots to the back than initially intended and added less ivory to the front. The fur used on the front is EXTRA FLUFFY to add some varying texture to the puppet.

Body sewn together and attached to the head!

TAIL! I used the extyra fluffy fur again on the underside of the tail and added less spots than the concept art. Basically I pretty much swapped the spot patterns on the back and tail and I think it looks much better!

Tail attached to body - to do this I measured where I wanted the base of the tail to be and cut a slit the width of the top of the tail. I sandwiched the tail into the slot and sewed through all the layers with a backstitch twice before blanket stitching a third layer of stitching to neaten it up a bit.
I got started on her arms today but didn't finish them, hence no pictures. My arm rods are in the mail (yes I bought pre made rods for this project - didn't have the time to make my own sadly) and will hopefully be here soon.
I'm not sure what to do about giving her legs or not in all honesty, I don't think she -needs- legs but it may turn in to a "if I have time" thing. Thoughts?
Re: Pippa Pup - first build! Posted by Shawn on May 17, 2013
Did you buy an extra arm rod for her tail? 
Legs or No Legs?
As a rule a hand in mouth puppet does not really need legs. They normally just end up hidden below eye level. Now if you think she is going to be used more like a vent puppet where you just hold her in your arms then I say go for it. Remember you don't have to be a ventriloquist to preform a puppet like this. Wayland always moved his lips when performing Madame.
Re: Pippa Pup - first build! Posted by Shirik on May 17, 2013
Alas I didn't buy a 3rd rod, honestly didn't consider it at the time but may offer to modify it to include a rod for whoever wins her at the charity auction  I think I'll go with no legs, I literally just finished up her arms just now.... just eyes to go and she's done!!!
Re: Pippa Pup - first build! Posted by Shirik on May 18, 2013
Annnnnnnnd.... she's done!!! :D
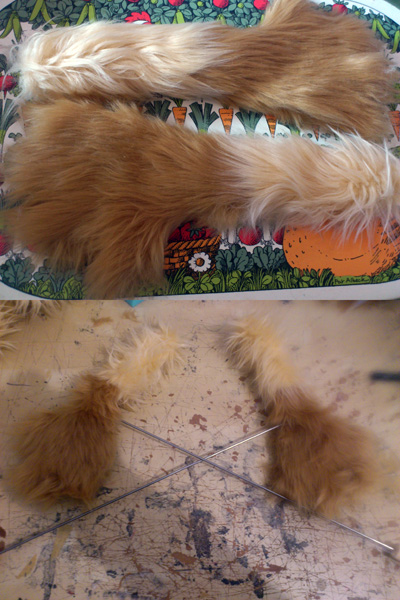
Arms sewn up and arm rods added - arm rods were purchased from www.onewayuk.com. Hands were made using the project Puppet arm rod tutorial with some modifications. Picture is prior to arms being shaved.
Eyes were made from styrene plastic and painted then given a fleece trim before being installed. No eye photos sadly, my bad!
AND DONE!
First pic stood on a packing tube. Second pic is me holding her.
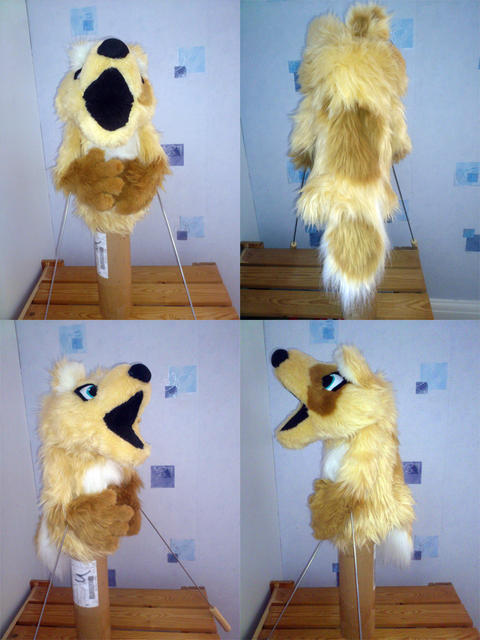
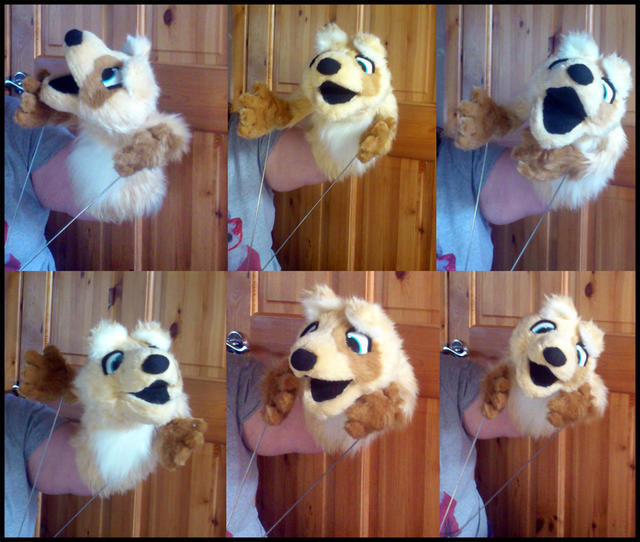
Very happy with her, learnt a lot with this build!

Arms sewn up and arm rods added - arm rods were purchased from www.onewayuk.com. Hands were made using the project Puppet arm rod tutorial with some modifications. Picture is prior to arms being shaved.
Eyes were made from styrene plastic and painted then given a fleece trim before being installed. No eye photos sadly, my bad!
AND DONE!
First pic stood on a packing tube. Second pic is me holding her.


Very happy with her, learnt a lot with this build!
Loading
No More Post
Error
- ← Previous
- 1
- 2 (current)
- 3
- Next →
Loading