Building first marionettes. need help with stringing. Posted by erikawildrick on Apr 27, 2014
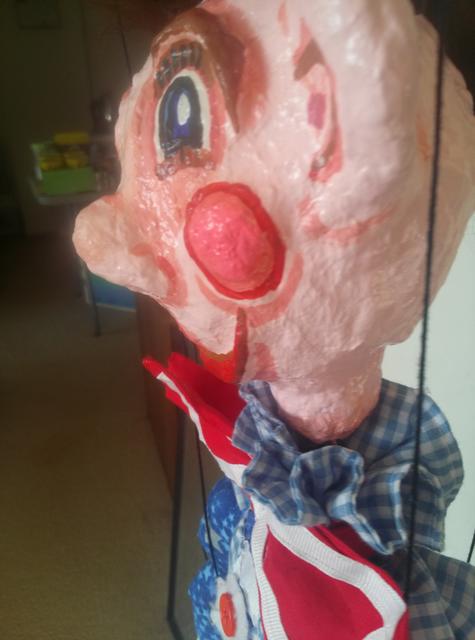
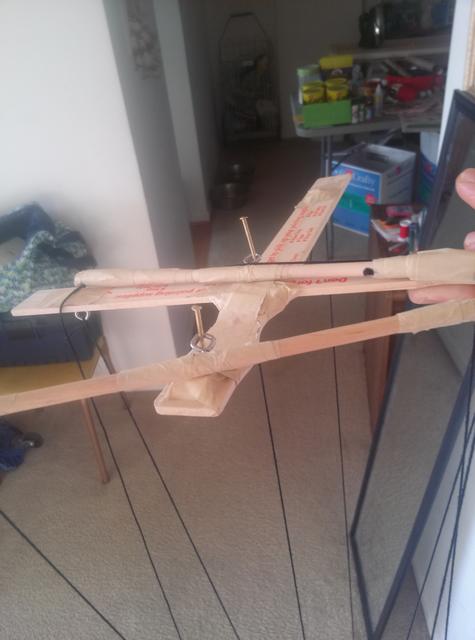
 Ive built the marionettes and have attempted to make the controller for one and string him. He can walk and move his arms just fine, and his butt string lifts his tail end in the air--but how do I get more mobility out of the head? I want him to nod his head up and down at the neck. His neck is completely loose and flexible so that is no problem. I also realize I will probably have to screw another eyelet in him- also, no problem.I've posted pics of the primitive controller and the three stings on his head. One top, two at the ears. Also, you can see the body dangles fro the head by one point quite loosely and freely.Any help on more head control is greatly appreciated. Thanks!
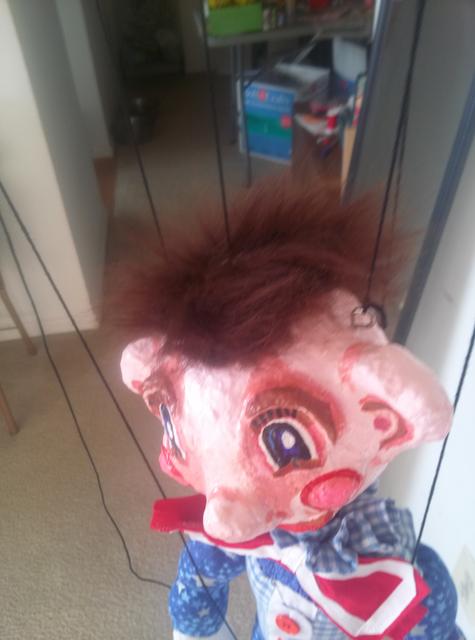
Re: Building first marionettes. need help with stringing. Posted by Shawn on Apr 28, 2014
To node the head you need to be able to lift up on the shoulder strings. On my controls the shoulders are attached to a drop bar below the main control. This is simply a bar that is suspended from the main one via a cord in the center of it. The weight of the puppet must be on the shoulder bar and strings. Your head needs to be strung so it has not carrying the weight of the puppet. While it is attached to the puppet for all intents and purposes, it is floating above the body. With this set up when you tilt the main control from side to side the shoulders stay level because of the suspended drop bar and the head moves side to side. Lift up on the shoulder bar and the head nods down. In fact you should be able to put a string in a puppets nose that is tied to the front of the control and then by pulling up on this it makes the puppet look up. Bending your puppet over via the butt string should allow you to tilt the main control side to side thus making the puppet look side too side.
Re: Building first marionettes. need help with stringing. Posted by erikawildrick on Apr 28, 2014
Thanks! This makes perfect sense. There is so much to learn, and I was basically guessing at it... Awesome! There is a lot of work to be done on my puppets now. Luckily the bodies are easy enough to rip out and reassemble.Love how the head does not have to bear the weight of the body. I imagine this will make huge difference in how it moves. Thanks, Shawn! Very helpful.
Re: Building first marionettes. need help with stringing. Posted by erikawildrick on Apr 29, 2014
Shawn, I did try what you said and it worked! I need to get a book to show exactly where the holes in the controller should go so they don't interfere with each other. Can't wait to try more things. She looks alive.
Re: Building first marionettes. need help with stringing. Posted by Shawn on Apr 30, 2014
Oh yes a book will for sure help! Quite a few of the books devoted to Marionettes will highlight the vertical control more then the horizontal airplane control but should at least have the basics in them. Also remember that there is not an exact formula for placement of strings in both the puppet and the control. It is all about balance. Moving the string attachment from the inside of a knee to the outside can give you a completely different movement. It all depends on what you want for the puppet. Sometimes you want the leg bar strings attached to knees and other times you may want them attached to toes or shines. I will say though that norm is the knee on this one. 
A quick note about the head strings. I just noticed yours are attached to the top of the head. I place mine kind of in front or behind the ears. You want them just above the balance point head as a rule (don't forget though rules can be broken). I don't use screw eyes but actually embed the strings in the head. Ever seen those long needles at the craft store. The often call them doll or teddy bear needles. They can be hard to find so if you do buy a couple packs of them because I promise you will break them. I figure out my balance point by simply using a couple of regular sized pins that I place on each side of the puppets head and then hold them to see how the head balances. If too low it will flip over on you which you don't really want. You want it to kind of swing or node gently with movement. Once you find these points you can take the long needle and go in from the side then out the other or towards the back where the hair is going to be. You want the place you are coming out to be easy to hide because this is where you are going to put a knot and then glue it to the head. I reinforce knots like this by embedding them in a small piece of felt. Push the needle through a small circle of felt before you knot it. Then place a dot of glue gun on the knot and fold over the felt. I often us a pretty big hunk of felt then trim it to a small circle after I knot and glue. Now you can glue this anchor to the head and the knot will not pull through the papermache'. BTW - your string can rip or pull through papermache' if it is not thick enough so make sure that you have strong layers where you will be placing your strings.
A quick note about the head strings. I just noticed yours are attached to the top of the head. I place mine kind of in front or behind the ears. You want them just above the balance point head as a rule (don't forget though rules can be broken). I don't use screw eyes but actually embed the strings in the head. Ever seen those long needles at the craft store. The often call them doll or teddy bear needles. They can be hard to find so if you do buy a couple packs of them because I promise you will break them.
I figure out my balance point by simply using a couple of regular sized pins that I place on each side of the puppets head and then hold them to see how the head balances. If too low it will flip over on you which you don't really want. You want it to kind of swing or node gently with movement. Once you find these points you can take the long needle and go in from the side then out the other or towards the back where the hair is going to be. You want the place you are coming out to be easy to hide because this is where you are going to put a knot and then glue it to the head. I reinforce knots like this by embedding them in a small piece of felt. Push the needle through a small circle of felt before you knot it. Then place a dot of glue gun on the knot and fold over the felt. I often us a pretty big hunk of felt then trim it to a small circle after I knot and glue. Now you can glue this anchor to the head and the knot will not pull through the papermache'. BTW - your string can rip or pull through papermache' if it is not thick enough so make sure that you have strong layers where you will be placing your strings.Re: Building first marionettes. need help with stringing. Posted by erikawildrick on Apr 30, 2014
Thanks Shawn. All this is great info that I will experiment with. The head balancing is very interesting. I did notice that most puppets had he head strings at the sides, not the top. I have to put my man puppet back together because i didn't like how he was hanging . It's all needle and thread, because he's basically a doll stuffed with fiberfil. Also, i want to make him feet that actually fit in the papiermache shoes. Then figure out how to hang the legs so his shoes don't knock together.It's a lot of experimentation--but it's a blast! I'll post some pictures when I get him figured out more.Thanks for all your help 
Re: Building first marionettes. need help with stringing. Posted by Shawn on May 01, 2014
Ah feet! Again I must use the word balance. I weight the back of the heel so that the foot hangs horizontal to the ground. That way the puppet does not drag his toe when he walks. I use lead fishing weights to do this. Now if you don't have an ankle joint then you don't need to do this. The other approach you can take, and I've done this with feet/shoes that are really front heavy, is to run a string from the toe through the front of the shin out the back of the calf then in the back of the knee and then out the front of the knee. This is called a run through line and when you pull the leg string the entire string should pull through the points thus pulling up on the front of the toe and forcing the knee to bend. In fact if you have a stiff knee joint or fabric that keeps the knee from easily bending you can do this run through simply from the back of the calf and on up through the back of knee and out the front to help with that also.
Re: Building first marionettes. need help with stringing. Posted by erikawildrick on May 01, 2014
I'm going to play with that concept when I reconstruct him, because now I'm thinking of doing a total rebuild. It seems like that runthrough line would pull his stuffing out when it draws through the leg.The fiberfill does tend to pull out of holes. Do you think it would make a much better puppet if I made him out bands of canvas attached to a stuffed body? Then cover his limbs with clothing? It seems like a whole different thing when you make a doll from fabric instead of wood or more rigid materials. I just wanted to use fabrics because I have a lot of it and it's easy for me to use a needle and thread. I used "jump" rings for jewelry making to attach some of his joints. I just stitch them directly into the fabric and join the body parts. He's hooked together with button and carpet thread, rings, and fabric joints.What do you think? I use little stacks of pennies in the girls shoes for weight. I think the man's heels need pennies too.
Re: Building first marionettes. need help with stringing. Posted by Shawn on May 02, 2014
I use muslin tubes for my legs and arms on marionettes, will at least many of them. I make the tube then stuff it to where I want a knee or elbow. then I run two lines of stitching across about maybe a 1/2" apart to create the joint the stitch the rest! I've done this run throughs in these and never had an issue with the stuffing coming out.
Pennies are fine to use. I used the lead weight because they are heavier so take less to get weight I needed. Also I would often take one of the egg shaped weights with the hole through the middle and sew it to the front of the knee joint to create a stop of sorts to keep the knee from bending the wrong way. The only thing is I always covered my legs in clothing. That really wouldn't work for the look of yours. I really like the look of your marionettes. The fact that the "clothing" is part of them is very cool.
Pennies are fine to use. I used the lead weight because they are heavier so take less to get weight I needed. Also I would often take one of the egg shaped weights with the hole through the middle and sew it to the front of the knee joint to create a stop of sorts to keep the knee from bending the wrong way. The only thing is I always covered my legs in clothing. That really wouldn't work for the look of yours. I really like the look of your marionettes. The fact that the "clothing" is part of them is very cool.
Re: Building first marionettes. need help with stringing. Posted by erikawildrick on May 02, 2014
Thanks, Shawn. i finally looked at your album and puppets. Very nice! It looks like you enjoy color too. I'm super curious to try some of these stringing techniques you've shared.I work a "regular" job, and my puppet making time is sadly limited!But when I get one of the puppets strung again and a controller put together, I'm going to post pictures to show you.Thanks again for all the info, extremely helpful, and fun to communicate with fellow puppeteers.
Loading
No More Post
Error
Loading