Re: School Puppet Posted by Chris Arveson on Aug 30, 2014
Thanks for the file!
Re: School Puppet Posted by JonathanB on Aug 30, 2014
No problem, let me know if there are any mistakes or suggested tweaks. I lined up the seam with the shoulder as it was slightly offset on the original - not sure if this was the right thing to do or not.
Just need to enlarge a little and make it up properly for my puppet now! A project for next week on my days off I think...
Just need to enlarge a little and make it up properly for my puppet now! A project for next week on my days off I think...
Re: School Puppet Posted by JonathanB on Aug 31, 2014
I've put the body plans to one side for now and as my fleece has arrived thought I'd have a play with the arms and hands.
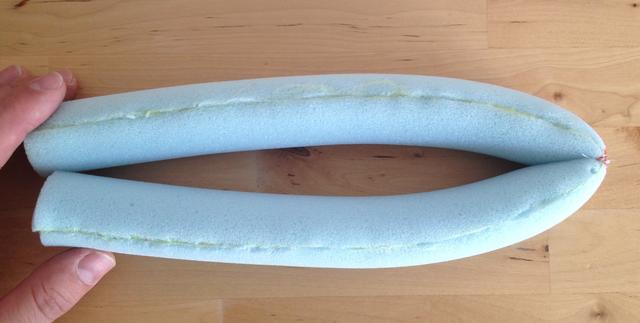
I've made the arms with the usual foam cylinder and have hand stitched across the middle to form a bend for elbow:
I then stuffed into my machine-sewn tube of fleece - not the easiest operation!
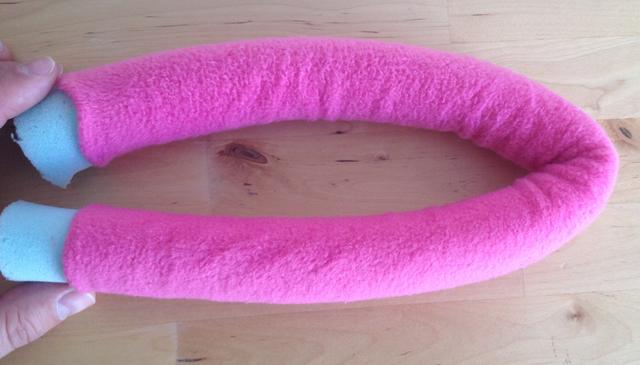
They're a bit long at the moment, but it gives me options at least!
I've also used the machine to stitch my two hand pieces together and then stuffed with my foam hands, finishing with an attempt at the Henson stitch to close up below the thumb. I've left extra fabric to help join to the arm... somehow! It's not perfect, but I think it's good enough.
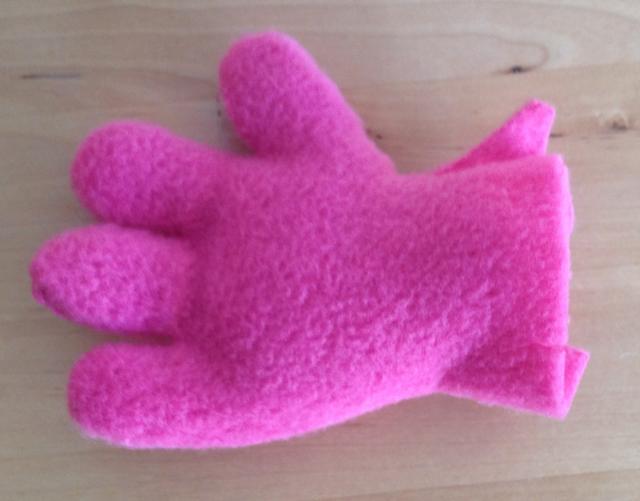
Yes the fleece is very bright, but my wife is happy with it!
I've made the arms with the usual foam cylinder and have hand stitched across the middle to form a bend for elbow:
I then stuffed into my machine-sewn tube of fleece - not the easiest operation!
They're a bit long at the moment, but it gives me options at least!
I've also used the machine to stitch my two hand pieces together and then stuffed with my foam hands, finishing with an attempt at the Henson stitch to close up below the thumb. I've left extra fabric to help join to the arm... somehow! It's not perfect, but I think it's good enough.
Yes the fleece is very bright, but my wife is happy with it!
Re: School Puppet Posted by Shawn on Aug 31, 2014
You are doing great! Just a couple suggestions that may help you. For your arm you could have made it in two sections with a fabric connector in place of where you put the stitch. The advantages of this if you make that fabric piece long enough then you won't get that bend in the upper and lower pieces when you are bending them. It should also be a bit easier to actually bend the arm and hold up better over time. I like your foam tube idea for the arms... like you said they are long but you can cut them down easily. I use fabric tubes made of cotton and then stuff them with batting. I sew the "hing" but doing two stitch lines in the middle about 1/2 " apart. Both ways are fine. One is not better then the other. 
For your hand attachment to the arm may I suggest that you add a fabric hinge between the two. Heavy cotton or even a bit of old jeans cut up would work. Since your hand is foam also this should be really easy cut a small slit in both the hand and arm then glue your fabric hinge between the two sides of the foam. Make sense? This will give you a good solid connection. Once done use the Henson stitch on the pink fleece to finish off. Make sure you don't get this all to tight. Give some slop in this joint just like you want in your elbow. It can be a fine line between too much slop and not enough. You have to remember that you are adding layers of fabric on top of your bases where the hinge is.. i.e. the fleece skin and then the cloths. All these layers add resistance to movement. It is one reason when I build marionettes I look for really soft flexible fabrics to cover them in. I made the mistake with one of my marionettes once who I wanted in jeans. I used an old pair of jeans... it made his walk really stiff! It was ok for the character in that case but was kind of unnatural looking.
For your hand attachment to the arm may I suggest that you add a fabric hinge between the two. Heavy cotton or even a bit of old jeans cut up would work. Since your hand is foam also this should be really easy cut a small slit in both the hand and arm then glue your fabric hinge between the two sides of the foam. Make sense? This will give you a good solid connection. Once done use the Henson stitch on the pink fleece to finish off. Make sure you don't get this all to tight. Give some slop in this joint just like you want in your elbow. It can be a fine line between too much slop and not enough. You have to remember that you are adding layers of fabric on top of your bases where the hinge is.. i.e. the fleece skin and then the cloths. All these layers add resistance to movement. It is one reason when I build marionettes I look for really soft flexible fabrics to cover them in. I made the mistake with one of my marionettes once who I wanted in jeans. I used an old pair of jeans... it made his walk really stiff! It was ok for the character in that case but was kind of unnatural looking.
Re: School Puppet Posted by JonathanB on Sep 01, 2014
Good suggestion thanks! I may have to re-make the covering for the hand pictured as I might not have left enough material to join it, but it's been a good learning experience! The other hand has much more fabric left over. Thanks for the fabric "hinge" suggestion, seems like a great way to join the pieces together... not sure I want to unstuff and re-stuff the arms again though as they were quite awkward - we'll see how it goes.
Either covering the head with fabric or making the body next I think!
Either covering the head with fabric or making the body next I think!
Re: School Puppet Posted by Shawn on Sep 01, 2014
You shouldn't have to un-stuff the hand. Just push the fabric back about an inch or so so you can get to the end of the foam. If you don't wan to re-make the one hand just sew on an extension to the end of the fabric. If it shows too bad you could always cover it with a bracelet! 
Re: School Puppet Posted by Chris Arveson on Sep 01, 2014
A suggestion for arm and leg stuffing. Get a plastic or metal tube/pipe large enough for the stuffing to slide up into. The smoothness of the tube should make the sliding fairly simple. Leave 1/2" to 1" protruding from the tube.
Then slide the fleece covering over the outside of the tube. Again the smoothness of the tube should make this fairly simple. After that, pinch the end of the fleece covering together with the protruding portion of the stuffing, and then simply pull the tube out the other end. When the tube is out, you have a stuffed arm. You may need to do some adjusting, but that's easier than sliding the stuffing into the covering without the tube.
Another method is to turn the covering inside out. Push one end into the inside of the length of covering. Work the stuffing into that one inch length, then start working the remaining portion of the covering down over itself and the stuffing. Pinch a little of the covering on each side, and pull down the stuffing. Continue doing that until the arm is complete.
Re: School Puppet Posted by JonathanB on Sep 02, 2014
I've cut some foam for the body, and started larger than the paper plans:
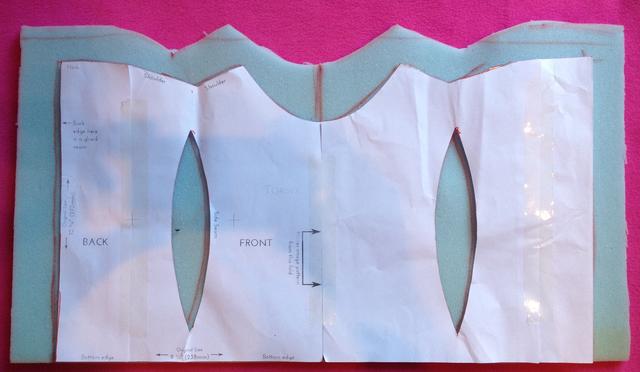
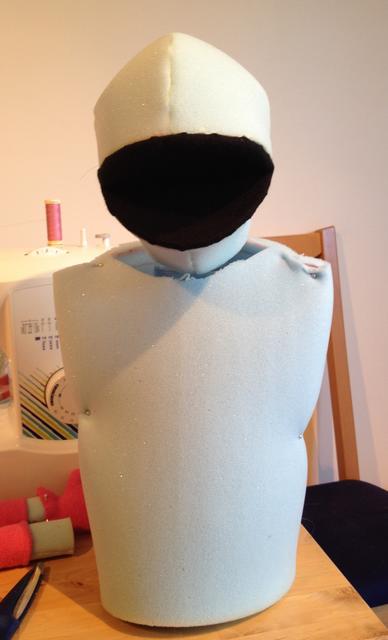
It's just pinned for now and I've not cut out the side seams to shape it properly... wondering if it's a little too big in fact. Certainly I think it's a little too tall.
Update...
I eventually decided that the height of the original plan was about right - thinking of the length of a person's forearm to go inside really. I made it ever so slightly wider than the original plans, and also made the darts run straight down to the bottom and slightly thinner - this is supposed to represent a child, so the really curved form of the original plans just wasn't quite right! Here it is glued together:
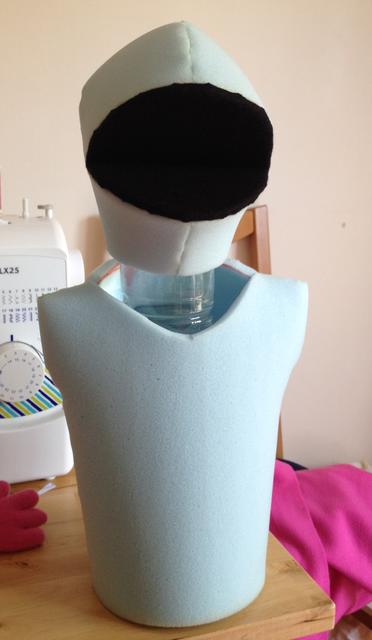
Re: School Puppet Posted by Chris Arveson on Sep 02, 2014
It looks about the right size to me for a puppet that will be out in front of a curtain. With legs attached, it would probably look better proportioned. Typically this style of puppet ends up wearing Toddler's 4-T sized clothing. If you have access to a 4-T t-shirt, then you would be better able to judge what size the body should be.
Re: School Puppet Posted by Shawn on Sep 02, 2014
Looks good... you made some smart choices! Might still be just a bit long but that id easy enough to change if once you get the head attached that you find it is. You where right to think about the length of the arm.
Loading
No More Post
Error
Loading